We wanted this construction to match the house in looks and material as close as possible. I priced out the basic materials and got to a point real fast where, talent, time and money wise, it made more sense to hire a shed building company. We had seen sheds and buildings built by Gator Tough in Pensacola and liked them, so we contracted with them for the construction. The shed will be built on 4x4 skids and anchored with hurricane straps. It will have a ramp for the garage door and personnel door. As they put it together I'll share pictures, in case you're considering whether to build one yourself or have it done.
We picked a relatively flat area in the yard, looked for a spot where we didn't have to cut down any trees. There is a road behind us in this picture, so the shed goes out front to avoid blocking Bay view behind the house. Also going to place it off to the left side a bit.
 |
| From SBR 4: Jun 2014 - |
My neighbor carried the french doors/loading dock doors home from Lowes.
 |
| From SBR 4: Jun 2014 - |
 |
| From SBR 4: Jun 2014 - |
Survey flags placed. Our County requires 50 feet from the front property line, 5 feet from sides and 10 feet from the house. There is also a setback from the water but I can't remember that number. Tf the shed is under 600 square feet and not plumbed, so all we need is an permit to build.
 |
| From SBR 4: Jun 2014 - |
Gator Tough crew showed up and started laying out the foundation blocks. For Day 1 they brought the foundation, floor and wall studs. The blocks will be used to level the skids, and the shed will be built on top of skids. Other option was a concrete foundation, that would have added about $5000 to the project and I wanted a wood floor for the wood boats and for potential lofting and building of boats one day. The wood floor will help keep the boats from drying out.
 |
| From SBR 4: Jun 2014 - |
 |
| From SBR 4: Jun 2014 - |
Pressure treated lumber was cut and added in as needed for shims and 2x4 joists started going down over the 4x4 skids. Other options are 6x6 skids and 2x6 joists, but our boats and trailers are light (800-1000 pounds). We did elect to go with 12 inch on center (OC) joists and a thicker plywood floor (7/8 inch) so the trailers will not punch through.
 |
| From SBR 4: Jun 2014 - |
16x 20 frame squared up, then roofing felt was laid down as a water resistive barrier (wrb). The felt breathes so any water that finds its way under the shed will not get trapped against the wood. Additionally all of the skids, joists and flooring are pressure treated or exterior grade. Then they started nailing down the floor.
 |
| From SBR 4: Jun 2014 - |
 |
| From SBR 4: Jun 2014 - |
I helped hold the felt down :)
 |
| From SBR 4: Jun 2014 - |
One guy cut and marked wall stud placement while the other nailed. They move fast!
 |
| From SBR 4: Jun 2014 - |
Walls were nailed up on the deck then stood up. There will be two windows on this wall, that's why the studs are spaced like they are. A 2x4 is used on each end to hold up the wall until they can get it squared and plumbed. There are also hurricane straps to tie the bottom plate/studs to the floor and the top plate to the studs.
 |
| From SBR 4: Jun 2014 - |
 |
| From SBR 4: Jun 2014 - |
 |
| From SBR 4: Jun 2014 - |
 |
| From SBR 4: Jun 2014 - |
 |
| From SBR 4: Jun 2014 - |
 |
| From SBR 4: Jun 2014 - |
There will be a french door on this wall.
 |
| From SBR 4: Jun 2014 - |
 |
| From SBR 4: Jun 2014 - |
Two wall top plates get notched so that the adjoining walls overlap and tie in.
 |
| From SBR 4: Jun 2014 - |
 |
| From SBR 4: Jun 2014 - |
View from the front door.
 |
| From SBR 4: Jun 2014 - |
Staring on the back wall, far wall will have a garage door.
 |
| From SBR 4: Jun 2014 - |
 |
| From SBR 4: Jun 2014 - |
There's the opening for the french door.
|
| From SBR 4: Jun 2014 - |
3rd wall up.
 |
| From SBR 4: Jun 2014 - |
4 stud walls up on Day 1.
Corner details.
 |
| From SBR 4: Jun 2014 - |
 |
| From SBR 4: Jun 2014 - |
17 Jan 2015:
Wall sheathing is up!
 |
| From SBR 4: Jun 2014 - |
Bottom of sheathing is wrapped with a waterproof membrane, to prevent water intrusion from below. The wall sheathing will be wrapped with a moisture barrier and then covered with Hardy plank.
 |
| From SBR 4: Jun 2014 - |
 |
| From SBR 4: Jun 2014 - |
 |
| From SBR 4: Jun 2014 - |
Carpenter art.
 |
| From SBR 4: Jun 2014 - |
Tie downs.
 |
| From SBR 4: Jun 2014 - |
 |
| From SBR 4: Jun 2014 - |
 |
| From SBR 4: Jun 2014 - |
James built the rafters on site and cut the ends. They hang them upside down then flip them from either side to stand them up.
 |
| From SBR 4: Jun 2014 - |
 |
| From SBR 4: Jun 2014 - |
The notch on the left is where the rafter rest on the top plate and the end is beveled for fascia board.
 |
| From SBR 4: Jun 2014 - |
Back wall.
 |
| From SBR 4: Jun 2014 - |
Garage door wall.
 |
| From SBR 4: Jun 2014 - |
Roof sheathing with hurricane clips between panels. Crew added a board to hold walls together with extra weight of crew until roof is finished.
 |
| From SBR 4: Jun 2014 - |
 |
| From SBR 4: Jun 2014 - |
 |
| From SBR 4: Jun 2014 - |
Sheathing will be trimmed back for a 12x7 garage door.
 |
| From SBR 4: Jun 2014 - |
Waiting for the french door.
 |
| From SBR 4: Jun 2014 - |
 |
| From SBR 4: Jun 2014 - |
Windows installed, Hardy plank siding and trim attached. Shingles on and ramps are built.
 |
| From SBR 4: Jun 2014 - |
 |
| From SBR 4: Jun 2014 - |
We filled up the shop fast!
 |
| From SBR 4: Jun 2014 - |
08 Mar 2015: We found a color we like, Sherwin Williams Light French Gray saturated 150%
 |
| From SBR 4: Jun 2014 - |
18 Mar 2015: Willow and St Jacques enjoying some sun while the deck of the carriage house gets a coat of Olympic clear sealer.
 |
| From SBR 4: Jun 2014 - |
Deck before sealer.
 |
| From SBR 4: Jun 2014 - |
| From SBR 4: Jun 2014 - |
 |
| From SBR 4: Jun 2014 - |

Added a 12x18 side work deck for sanding and cutting, trying to keep dust to a minimum inside shed and avoid creating a mud pit next to the shed.. Also widened ramp a bit so tools and boats on wheels can be rolled in and out. Then added pergola, wisteria and grapes for shade.
The shed turned out to be the perfect spot to work on BARBASHELA and ST. JACQUES. Both boats were on rolling strongbacks, so they could be moved around as needed to create work space. BARBASHELA was 21 feet long, so she had to turn diagonal at the end of the day in order to close the door.


I am on the tribal rolls of the Citizen Potawatomi Nation, this is our medicine wheel. From the CPN website: "Many Native American tribes recognize the significance of the medicine wheel, the colors and directions that are associated with them.
For the Potawatomi, the East is the direction of new beginnings and life, and signifies springtime. It is associated with the color yellow and the Potawatomi medicine of sema (tobacco). As an elder once said, “Sema precedes all things,” meaning tobacco is used by the tribe as a blessing before starting a ceremony or gathering.
South is the color of red, and signifies the summertime, when the weather is warm. It is the direction of abundance and plenty, and is the direction of the medicine kishki (cedar). Kishki is used to prepare for ceremonies, and there is a tradition of a trail of cedar from the fire to the sweat lodge. Pipes belonging to tribal members that were made of cedar would be laid on the ground between the two structures. Kishki is also mixed into tobacco to provide enough smoke to get the attention of the spirits who will see the prayers of the Potawatomi. Cedar boxes are also used to keep mites and other insects off of ceremonial eagle feathers.
West is the direction of the medicine wabshkebyek (sage) and its color, black. Sage is used in the practice of smudging, where smoke is wafted over a person to rid the body of negativity. In fact, prior to CPN Legislative meetings, it is not uncommon for a smudging ceremony to take place prior to representatives and government officials commencing regular business. In the case of eagle feathers, smudging is used to cleanse the feathers. West also signifies the season of fall and of endings, and Potawatomi beliefs traditionally held that once a person passed on, they moved in that direction. This is why traditional burial ceremonies held that bodies were passed out a Western window.
North on the Potawatomi medicine wheel is the color of white, and is the direction of elders and winter time. In the days when the Potawatomi lived in their traditional lands near the Great Lakes, the winter snows were thought have a cleansing power on the land. This is also the time of the year that the spirits are asleep, which is why winter stories are only told during this time. White’s medicine is wishkpemishkos (sweet grass), which attracts positive spirits and used after a smudging of sage.
The medicine wheel is a teaching tool that is intended to help people remember these important and significant aspects of life. Life itself is viewed not as a line, but rather a cyclical thing that has its own seasons of life, death and renewal."
For us our spirit is renewed as we work on renewing the boats, and we are thankful for opportunity to do so.

06 Nov 17:
Carriage house update. Runabout spends a lot of time on the covered boat lift, which opened up a spot for the WINNIE and ZIP on one side. We like keeping them in a wooden structure, protected from weather. The other side of the carriage house is used for primary projects. VIPER is riding the Sunfish work dolly while PHOENIX rests outside on a Dynamic dolly ($495 USD from our store).

16 Jan 18:
Update. VIPER sold to great new owners. WINNIE and ZIP are still snug on the south side. Our new 1979 Drascombe Dabber VICTORY is in the Boat Works as the primary projet now, we picked her up in November 2017. Her bottom paint and leak repairs are complete. Next up on the Wheel Deck is our 1980 AMF Sunfish SUGAR 2 on the finishing dolly, and CYANE is trying out a new spot nearby.

19 Jan 18:
Update on the carriage house occupancy aka HERUER GARAGE. The O'Day CYANE was moved closer to get some shelter form a Winter storm and she kind of likes it out there. Sunfish SUGAR 2 is awaiting a bow repair, 1979 Drascombe Dabber VICTORY currently occupies the starboard berth and ZIP and WINNIE occupie the port berths.

24 Mar 18:
We put a wire shelf up high, behind the overhead door tracks, mainly to store spars. Turns out it is a good spot to store other supplies, and with the glove box flipped upside down I can reach up and pull gloves out one at a time. It track also rides herd on our shop rag box.


When I use blue tape I turn an edge down to make a little tab, that makes it easier to grab and remove when the time comes, even if wearing gloves.

This shelf at shoulder level holds our most used small power tools and gloves. They are the things that I reach for the most, and they are easy to see.

25 Mar 18:
I am not the neatest painter, so when big blobs of paint get on the carriage house deck, I turn some of them into Sunfish. Each one has a story tied to a boat we were painting. Pretty soon the whole deck will be covered :)

13 Apr 18:
Update, the carriage house currently hosts WINNIE, ZIP, VICTORY and ZSA ZSA. Wisteria are blooming and grapes are coming in.


27 Mar 19:
Current occupants of the Carriage House. 1953 Alcort Sunfish ZIP, 1963 Alcort Sunfish CHIP, 1950s Alcort Standard Sailfish WINNIE hiding in the back and the keel for a new Pascagoula Diamond Bottom Catboat MARGARET ROSE.

30 Apr 19:
Current state of affairs in the carriage house. Working on the 1963 Alcort Sunfish CHIP. Keel laid for the Pascagoula Catboat. ALcort Sunfish ZIP and Alcort Standard Sailfish WINNIE are supervising.

29 Jun 19:
Current occupants of the Carriage House (L-R):
1953 ALcort Sunfish ZIP, 1965 Alcort Sunfish WAVE, 1950s Alcort Standard Sailfish WINNIE hiding in back, MARGARET ROSE's keel under ZIP.

30 Jun 19:
SCOUT bunking with ZIP, WAVE, WINNIE and MARGARET ROSE for the night.

19 Oct 19:
We had Tropical Storm Nestor heading our way, so that generated a round of TETRIS. We had some boxes packed and in the garage, prep for our upcoming Tidewater move. Well that move will probably happen in the Spring, so we decided to move the packed boxes back inside, and get Mustang SALLY out of the Carriage House and back into her garage spot.

Once SALLY moved we were able to stow ST. JACQUES, PHOENIX, SACAGAWEA, CLARK and SCOUT in the Carriage House with WAVE.

TS Nestor came and went, with a little rain and wind. SCOUT and her buddies moved back out to their tree.


23 Oct 19:
Tropical Storm Nestor scooted by to the East

26 Nov 19:
WAVE in for restoration.

11 Jan 20:
WAVE and the keel batten for the Pascagoula Catboat are current occupants.

15 Jan 20:
WAVE

04 Mar 20:
A tour of the Carriage House to keep everyone updated on the current state of affairs in the HEUER Garage and Lewis Boat Works.


17 Apr 20:
17 Apr 20:
Evaluation of ZIP's hull puncture, and other Carriage House happenings.
05 Jun 20:
Landscaping and hardscaping continues, another trip to Lowes to gather 12 pavers, 12 bags of pea gravel and 4 bags of river rock. Plus more potting soil, plant caddies, and a few pieces of St Augustine sod. Before we went to Lowes though, we needed to shave a yak, in the form of repurposing the old Drascombe Lugger sole from ONKAHYE into a deck that could be laid over the bunks on one of the boat trailers, turning it into a utility trailer. More pictures on that later, but we screwed 1x6 deckboards every few feet underneath the old sole to act as crossplanks and tie it all together, then we lashed the entire thing to the trailer bunks. It worked out great, we loaded about 1000 pounds of stuff onto the deck, all wrapped up in a tarp. Strapped everything down with cargo straps and line, Skipper complimented my excessive use of securing accoutrements.
Fancied up the perimeter of the Medicine Wheel Deck and Carriage House, just in time for Tropical Storm Cristobal. More sod on the way Tuesday, delivered, woo hoo! The plants include citronella and lemongrass, known to shoo off skeeters, or mozzies as our Brit friend Murray calls them, and other bugs. Wisteria on either end with grapes on the middle two posts. Our idea that the wisteria and grapes would provide shade in the Summer has worked out great, and then go dormant over the Winter and open up for more sun. The grapes also feed the salamanders, we even get a few if we are fast enough. Not to give all the shade credit to the wisteria and grapes though, the massive southern yellow pine tree does its part. The location of the Carriage house was developed to incorporate the tree into the aerial footprint of the shed, along with two others on the street side.

We should get a separate address for the Carriage House in case you want to send post cards. In the meantime we store garden tools inside of our signal flag mailbox, and that handrail/doorstop might be a good spot for a garden hose holder...if only we had the DIY skills, we could make one!

Current residents while TS Cristobal passes, Grumman 17 canoe SCOUT, Pelicon Icon kayaks CLARK and SACAGAWEA, Alcort Sunfish ZIP, Alcort Standard Sailfish WINNIE and Pascagoula Catboat 16 MARGARET ROSE.


02 Jan 21:
Current status of the Carriage house, repairs are underway on our 1965 Alcort Sunfish WAVE (L) and 1982 AMF Alcort Sunfish PHOENIX (R). There are also some parts cut out and lumber for the Pascagoula Diamond Bottom catboat MARGARET ROSE, the transom barely visible above WAVE's port side.

11 Jan 21:
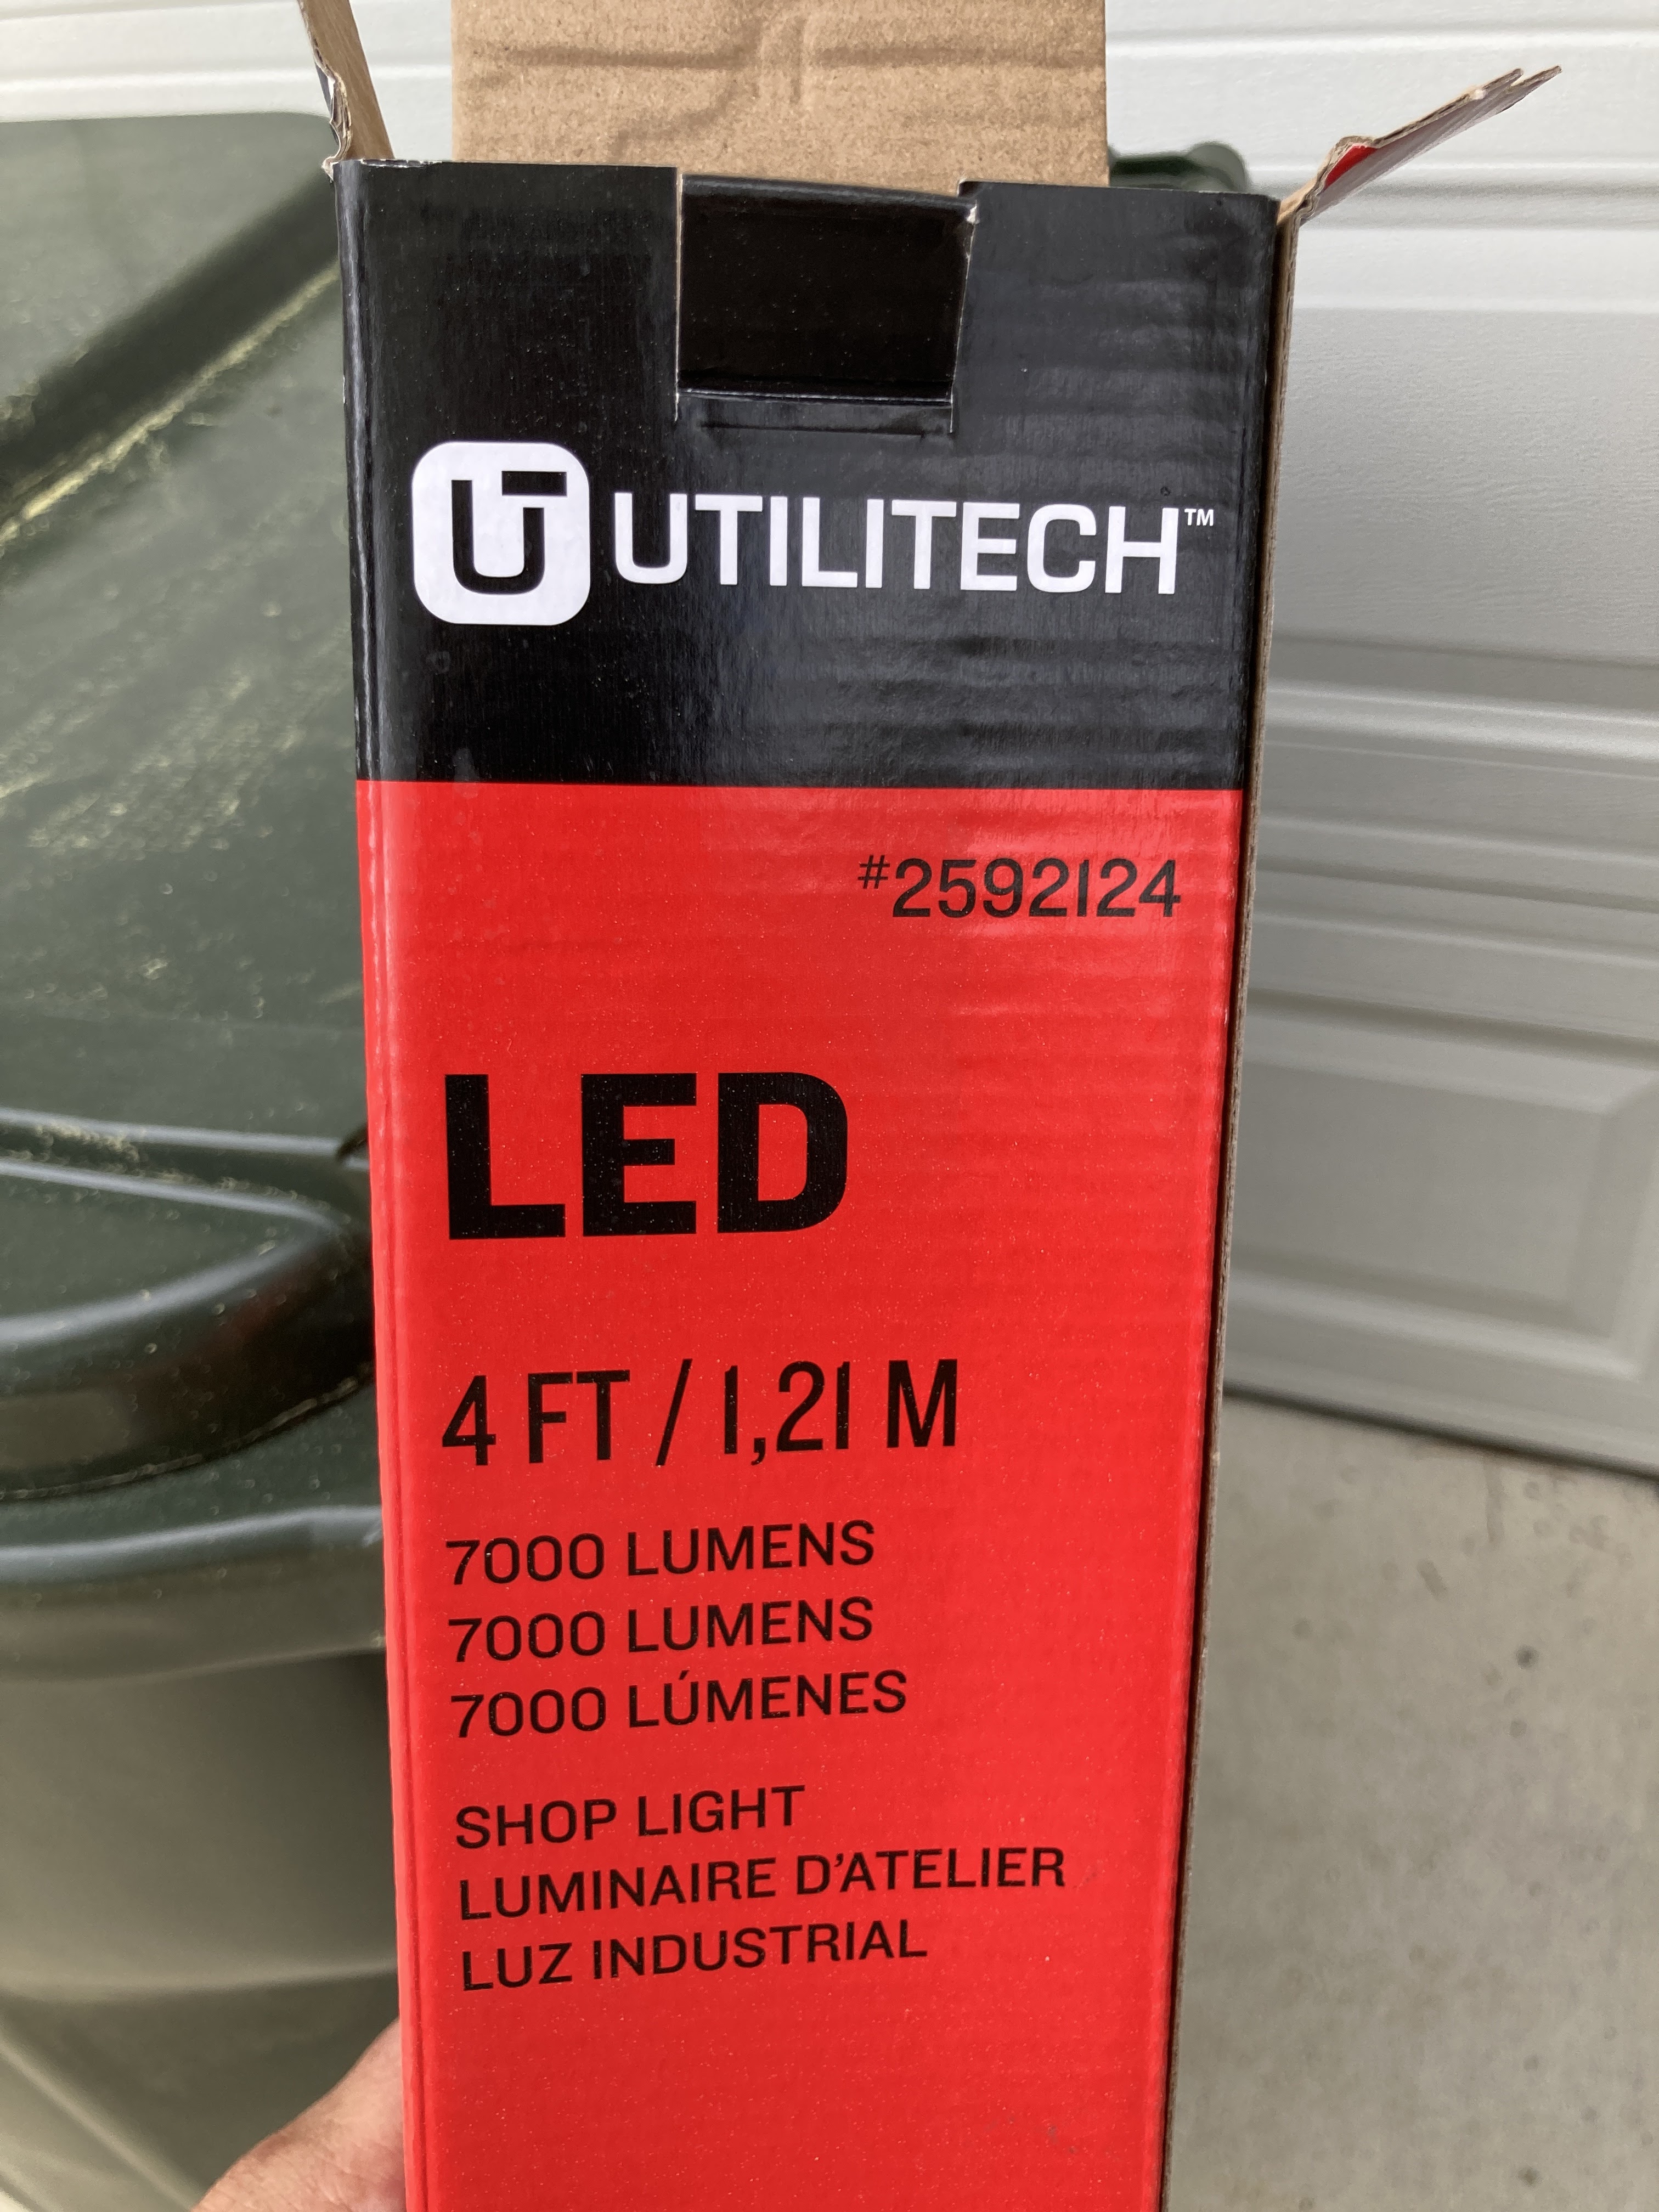
I finally got tired of changing fluorescent bulbs and got the Carriage House upgraded to LED lights. The electricians came out, bypassed the ballast in the existing fixtures and installed T8 LEDs. Took them about 40 minutes, even with me telling Sea Stories. Wow, what a difference! We never knew we had so much stuff...

...and we should be able to retire with the energy savings :)
27 Jan 21:
Current State of the Carriage House, the little punt SCUPPERS is under construction on the left and 1950s Alcort Standard Sailfish is in the House to get her offsets and lines taken before she goes into the PODS container. The Sunfish Finishing Dolly is rolled out onto the Medicine Wheel Deck.

22 Feb 21:
Carriage House contents are leaning out, SCUPPERS went along with PODS #3 to the new homeport. WAVE is left holding down the floor, so next we'll roll the 1963 wooden Sunfish CHIP in to pack her in a moving container, she is heading to a Grand Adventure in NW, details to follow.


24 Feb 21:
We are making tracings of the Carriage House floor art and catboat half breadths, to transfer over to the new Carriage House in Virginia.

03 April 21:
Still moving bits around as the Armada shifts Homeport from the Gulf Squadron to the Atlantic Squadron. Carriage House was getting a little crowded with 2 Sunfish on dollies and a lawn tractor, and we wanted one of the Sunfish easily accessible for nice sailing days ahead before the final move.


22 Nov 21:
We moved! Our new Carriage House was delivered today to our new Mid Atlantic Station, we bought it prebuilt from a local shed shop. The crew that brought it in was amazing, they worked fast and quiet. And the special trailer was very interesting, there was a small set of wheels under the rear axle that could be dropped and worked remotely to shift the entire delivery trailer sideways.
Step 1 was making a final decision on where the Carriage House would go, the simplest spot was directly off the end of the driveway so that we can roll projects straight in and out.


22 Nov 21:
We barely had the new Carriage House an Hour before it was seized as a prize by Yard Art Pirates.


22 Nov 21:
We're adding light to the shed, with windows and electricity.
Seems someone loaded the cart too quick. A return trip to Lowes took care of the mix up.


22 Nov 21:
Ran an extension cord to plug in a few of the new LED lights, they look great. 2 lights put out a nice amount of light, 4 should be great. Each light has a chain pull so we can add or subtrract lumens as desired.


23 Nov 21:
Buy a new shed and immediately cut holes in the wall, makes sense, right? We used a cordless circular saw to get as straight a line as we could, then the sawzall to cut the studs. Once the 32x36 hole was cut we added back new studs for framing the sides of the window. In this photo we still need to add a horizantal framing piece above and below the window, which involves trimming the old studs a little.


More Pella window tape was applied to the exterior, trim and silicone caulk will follow. The window placement nestled nicely just under the roof's drip edge


25 Nov 21:
We started finding places for tools and materials in the Carriage House. First spot was for the pencil sharpener.


04 Dec 21:
The electricians wandered by to finish up the lights and outlets. We have 100A service now, 5 outlets, 4 LED lights, a 30A RV plug and another external outlet. Plenty of power for saws and Christmas lights.


15 Dec 21:
1x4 Trim added around windows. We used pressure treated pine and plan to let it dry for a month or two before we paint it.


10 Jan 22:
Current state of the Carriage House.


SCUPPERS has the watch.


12 Mar 22:
Our 1959 Sorg Runabout WILLOW needs a hard cover, and we want to TETRIS a few other boats and Skipper's lawn tractor. This 12x20 barn style shed may fit the bill with its roll up garage door, personnel door...


25 Mar 22:
The second Carriage House arrived, I guess we'll call it Carriage House East until something else springs to mind.


27 Mar 22:
This part of the yard gets runoff from the house, it stays wet, so we are going to build a gangplank from the driveway to the new shed, luckily we have a lot of experience repairing docks.


27 Mar 22:
Laid out concrete blocks and pressure treated joists for the shed gangplank. We're adding 18 feet across and 12 feet from the driveway to the shed. The level, smooth surface will make it easy to move our Armada around and to roll project boats out onto the concrete driveway.


29 Mar 22:
Continued work on the HEUER GARAGE gangplank, more pressure treated lumber entering the fray.


30 Mar 22:
FInished laying joist blocks and joists, then planked another 3 feet or so for the new Carriage House's gangplank.


07 Apr 22:
Added 2 more LED lights to the HEUER GARAGE aka Sorg shack aka Alcort Alcove. 28,000 lumens ought to do it.

08 Apr 22:
Flotsam and jetsam are finding their way in the new shop. A tour of our Boat Works: https://youtu.be/5eeELahQ4e8
18 Apr 22:
Applied some floor paint to the Boat Works shed.


Once the center stripe dries we'll shift some things around and get another section.
22 May 22:
We had to leave a clear space while the driveway was being poured, and today we dropped in the last section of ramp that leads into the HEUER GARAGE. The driveway was poured with a small slope to shed rainwater, and our hopes were that the small section would twist to follow the slope. Our hope was answered!


27 Aug 22:
It's hot in the Boat Works. The barn door is too low unless you're a hobbit. We want more light. And since the hobbit door on the bow opens onto 2400 square feet of sunny hot concreted during the Summer, Skipper has abandoned me for the shade off the stern. So we are going to install a 72x80 French door with 30 glass panes.
I spent part of the day removing the loft and relocating flotsam, jetsam and spiders, to make room for the door frame. While I could butcher a hole to fit it, I'm hiring a pro carpenter to install the frame.


06 Oct 22:
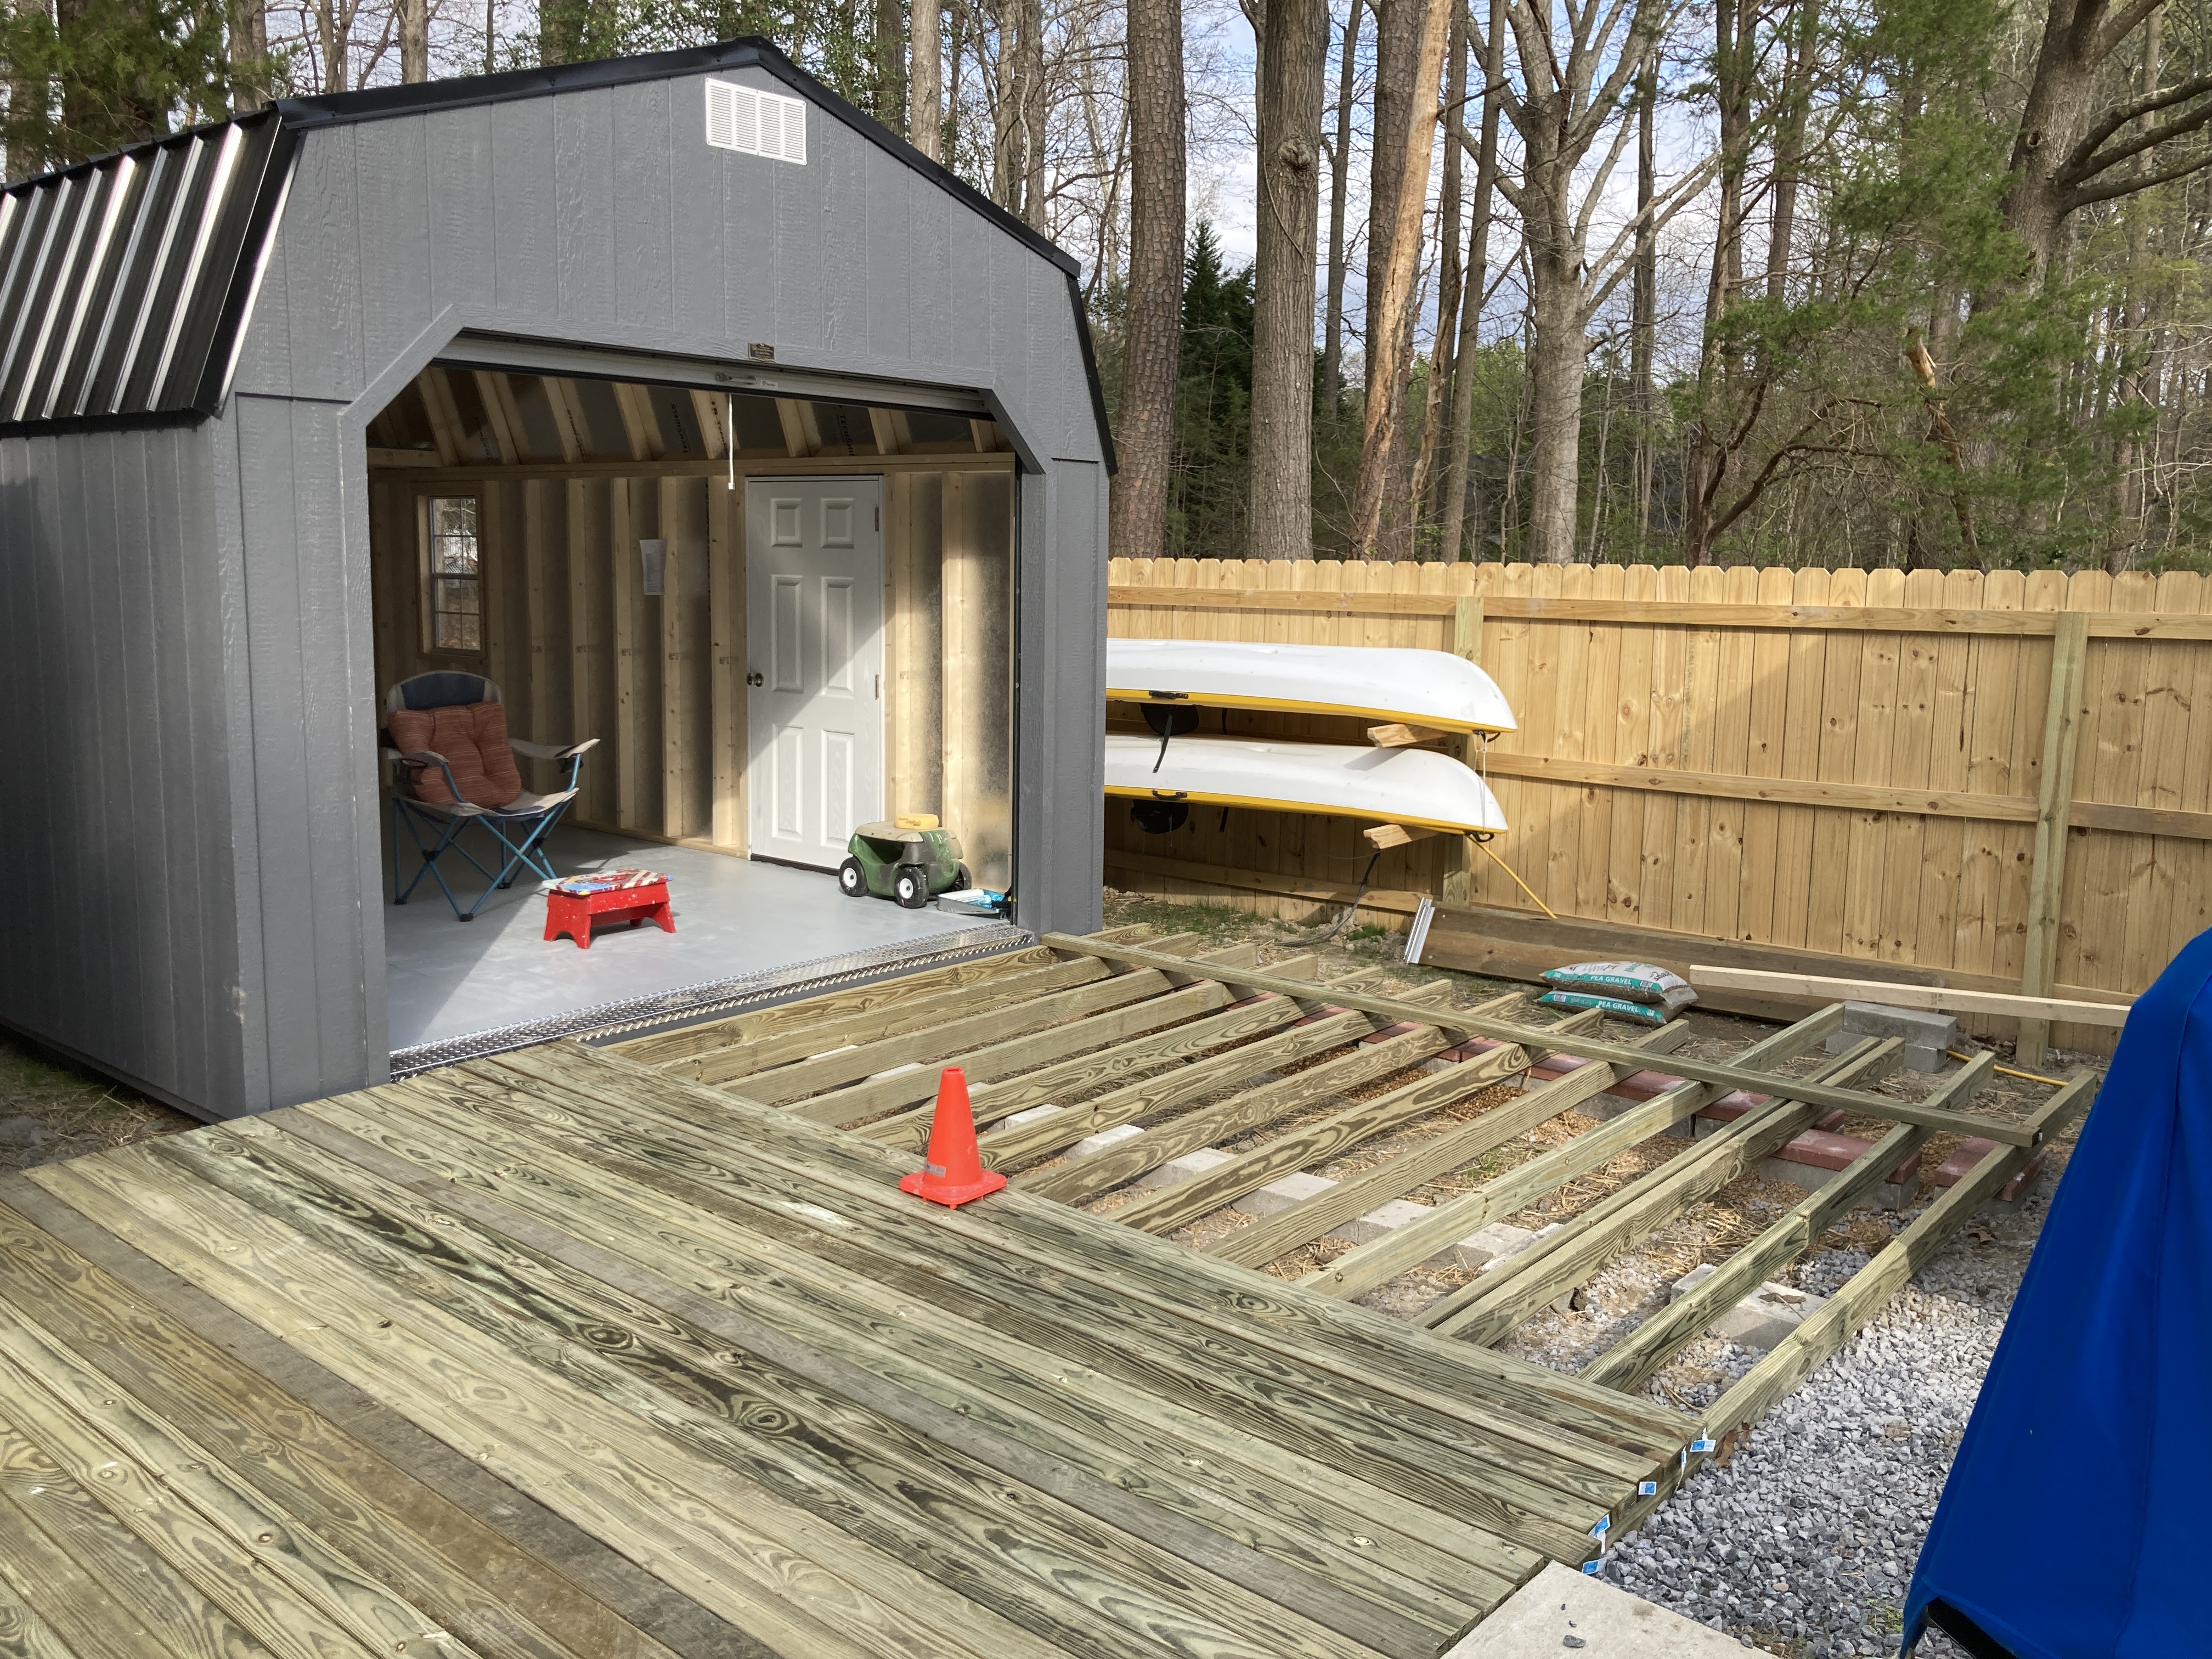
We like decks near the Boat Works to roll projects in and out for sanding, sawing and to enjoy nice weather. Skipper found a shady spot behind the Boat Works for a 12x20 floating deck and we spent a few days laying out the blocking and rim joists, our variation on pier and beam construction.
We repurposed some concrete retaining wall block, aka castle wall, to serve as the piers. Those were leveled with gravel and shimmed with pressure treated lumber in a few spots. Normally for a "floating deck we'd use 1 inch pavers as the pier, but his beck needed to be up a little higher to be level with the shed floor. 2x6 pressure treated joists are set on block, 24 inch on center. The allowable span for a 2x6 yellow pine on 24 inch centers is 7' 7", so we placed a block at 6 feet mid span on each joist. Rim and floor joists were fastened with Grip Tite deck screws.
Here we are working our way out from the shed, checking for square. We could have gotten 2x6 in 20 foot sections, would have delayed us a few days for delivery, but decided to grab the first batch of shorter boards ourselves with the trailer and get started. We alternated 12 and 8 foot boards around the rim and on the deck, deck joists are just under 12 feet.
Skipper nowhere to be seen when 50 pound bags of pea gravel and 20 pound blocks are being tossed around. It took a couple of afternoons to get to this point.


07 Oct 22:
We finished laying the 2x6 pressure treated pine deck and built a few steps around the perimeter. Let's take a tour. You might remember back to when we laid a gangplank for loading and unloading the shop, level from the driveway, and back up to before that when we had the shed placed so that the floor would be level with the driveway, and back up before that to when this area was a shady mud pit.

Here's the big reveal video: https://youtu.be/6wgUWaY9Q84


27 Oct 22:
Our handyman finished the paint on the HEUER GARAGE and LEWIS BOAT WORKS, it looks even better than we hoped. The door got a coat of Kirby Marine Paint See Red.


05 Nov 22:
I wish we'd discovered TimberLock screws years ago, they have come in handy with our boat yard deck and shop building. We have used them to attach rafters to top plates and rim joists to posts on our floating decks and covers. Easy to use, they go in fast with an impact driver and grip tight.

We used TimberLoks on the wood edging for the Quarterdeck.


05 Nov 22:
A little walk around Jack's Boat Yard...okay, a few of the boats are ours too.
08 Nov 22:
I spend a lot of time studying how other shops are set up, so we can have a fun space to mess about ashore. Today our electrician came by to wire permanent power to the HEUER GARAGE, a 12x20 shed that sits right next to the 12x20 LEWIS BOAT WORKS. The new electrical will power 3 wall outlets, and overhead quad outlet with a switch that controls the LED shop lights.
These LED lights came from Lowes, we like them because they come have regular plugs, can be turned off at the light if desired. The light bar also has its own outlet to connect other lights, extension cord, etc.


We have tried having outlets up high in a shop, and down at 16 inches above the floor. The votes are in, the high spot is the winner, as outlets down close to the floor tend to get covered by work benches, flotsam and jetsam, etc... And no bending over to plug things in.
The little Sailfish behind the plywood patterns is on a furniture dolly, as are 3 other dinghies in the shop. It only took minutes to move them outside or away from a wall while the electrician did his thing. Having boats and shop gear on wheels allows the shop to be reconfigured quickly, kind of like a theatre set. That is Skipper's influence, she has her Master's degree in theatre and has directed how the stage will be set.


01 Sep 23:
A few photos for a peek into the Carriage House and Heuer Garage.


18 Mar 24:
We bought another wire shelf system, to corral all of the flotsam that was jamming up this corner of the shop. Now each corner has the same shelf system, all of which can be moved around and reconfigured to match up with whatever project we have in the shop. For the most part we've found the corners of the shop to be the best spot for shelving.


12 Apr 24:
The spots where we put our LEWIS BOAT WORKS and HEUER GARAGE EAST sheds started off as a muddy clay spot, too shady to grow much grass. Over the last few days we added a small deck to the back end of the HEUER GARAGE EAST, and a walkway between the two sheds.


08 Jun 24:
The new boat yard signs are finished and installed for the HEUER GARAGE, LEWIS BOAT WORKS and we have a new sign, OUTLAW TRAILER COURT INC. More on that later, but first, a look back at where we were back in 2021...
...before the two sheds arrived...


08 Jun 25:
Here are some photos from the carriage house aka work-boat-shop-shed...
I had a Teams meeting today, and the Portugal attendee got a private tour of the shop.

Enough work, back to play.


No comments:
Post a Comment