Wednesday, September 25, 2013

Pirating About In Small Boats

If you are going to be pirating about in your petit bateau, your going to need some Captain's gear. Check out Pirating About for beads, bandanas, frock coats, shirts and sashes. Made for pirates by pirates.

From Small Boat Restoration 2013

From Small Boat Restoration 2013

From Small Boat Restoration 2013

Tuesday, September 17, 2013

ODay Daysailer Trailer Guides

The flat hull on the Daysailer makes it tricky to get back on the trailer, so we added some trailer guides to assist. Our local trailer manufacturer Eddie English in Milton, FL sells a nice trailer guide kit that comes with trailer brackets, steel guide posts and PVC rollers.

From Small Boat Restoration 2013

The guide brackets bolt onto the trailer frame. In order to get the right size guide it is important to know the size of your frame, the width of the frame and the beam of the boat.

From Small Boat Restoration 2013

The guide bolts into the frame and the PVC roller fits over the guide. These guides are pretty tall, but now I can see where the trailer is when backing up without the boat loaded. Before it was too low to see.

From Small Boat Restoration 2013

Monday, September 16, 2013

Drascombe Lugger Rigging

We keep all of our 1980 Drascombe Lugger ONKAHYE's sailing gear in the boat when it is stored in the garage. Some items get moved to the van when taking off for a road trip. Today we rigged in the driveway and launched from the neighbor's ramp.

From Small Boat Restoration 2013

All our kids outgrew this life jacket so now it pulls duty as a road trip cushion for the main and mizzen, lashed down with one of the dock lines around the starboard stern cleat and traveler. We fly a couple of pennants, so now is the time to ship those to the top of the mast and mizzen.

From Small Boat Restoration 2013

The main is stowed in a side locker, the rudder rides on the cockpit sole, rudder is cushioned by an old towel.

From Small Boat Restoration 2013

Here is the rigging for the mainsheet on a MKII Lugger.

From Small Boat Restoration 2013

The bumpkin gets shipped through the transom, sheet is clipped to the sail and bitter end led through hole in transom to jam cleat. We leave it retracted in case we spin the boat around at the dock, that prevents it from getting snapped off. We also drop in an electric motor, used to maneuver to and from the dock if wind conditions are not conducive to sailing to and from. (Edit: We now use a 4 stroke Suzuki 6, longer run time, plenty of power, burns clean and runs quiet. The trolling motor was good for maneuvering around slips but not so good against current).

From Small Boat Restoration 2013

We use one of our throwable cushions to protect the mast for trailering. It is secured with the dock line around the belaying pins.

We placed a silver dime at the base of the mast as a gift to the wind gods.

From Small Boat Restoration 2013

When I rig the boat single handed, I step the mizzen first to get it out of the way and then step the mast. You have to raise the gaff a little and make sure all the parall beads and rigging clear the thwart. Once the mast is up, I lash the base around the belaying pins with a sail tie to hold it in place while I secure the jib.

From Small Boat Restoration 2013

From Small Boat Restoration 2013

The jib connects to the furling drum, it is a job that requires 2 1/2 hands. The easy way is one person pushing the mast forward a little and holding out the jib while a second person pins the shackle into the furling drum. The cotter pin also has a retaining clip.

From Small Boat Restoration 2013

The side stays are secured by taking a few turns through the fairleads in the cockpit and then throwing on a few half hitches.

From Small Boat Restoration 2013

From Small Boat Restoration 2013

Check out Skipper's Guide to Small Boat Knots!

Once the main mast is secure we like to raise the main without it being sheeted and get the halyard and downhaul sorted out. Then we lower the main, clip the clew to the sheet and stow it on the cockpit sole on the side farthest away from the dock. That way when we step in the boat from the dock we are not stepping on the sail.

From Small Boat Restoration 2013

ONKAHYE rigged and ready for the ramp.

From Small Boat Restoration 2013

Don't forget the drain plug! Dropped the boat in, Skipper also handles Dock Wench duties, she keeps the boat calm while I get the trailer out of the water.

From Small Boat Restoration 2013

From Small Boat Restoration 2013

Once in the water in the dock, we drop a little centerboard, put the motor down and ship the bumpkin. We motor out a bit and drop in the rudder, raise the sails and go for a cruise. (Edit: We now have a wooden rudder rest that holds the rudder up).

From Small Boat Restoration 2013

ONKAHYE and CYANE taking a break.

From Small Boat Restoration 2013

Log of ONKAHYE.

Monday, September 9, 2013

Sunfish/Sailfish Mast Base Cap

The Sunfish and Sailfish masts have plastic cap on the base that keeps the aluminum from grinding through the hull.

From Small Boat Restoration 2013

If the cap will not go in easily, you can sand a little around the edge to get it started.

From Small Boat Restoration 2013

Once you get the cap started into the mast you can tap it in with a hammer or drop the mast onto a hard surface to seat it.


There is a small pin that can be inserted through the side of the mast to hold the cap in place, but when it fits this tight it is not needed.

The Sunfish, Super Sailfish and Super Sailfish MKII use the same size mast. These are the mast for Sweetness and Zsa Zsa.

From Small Boat Restoration 2013

DePersia Bailer

I bought a DePersia bailer for the wooden Sunfish Chip.

From Small Boat Restoration 2013

The bailer has the standard nylon ball that will float up when the boat is not moving and seal the bailer hole.

From Small Boat Restoration 2013

The bailer has a screw cap that can be opened and closed to let water out of the boat.

From Small Boat Restoration 2013

From Small Boat Restoration 2013

This is the bailer for our 1953 Sunfish :)

From Small Boat Restoration 2013


Super Sailfish MKII Handrail and Drain Plug

The Super Sailfish MKII handrails were missing a few screws, so we replaced them with #10 3 inch brass screws using a yankee driver.

From Small Boat Restoration 2013

From Small Boat Restoration 2013

From Small Boat Restoration 2013

There was a big hole by the bow handle, not sure if it was for a drain plug, but it looks drain plug size. So I went looking for a drain plug and found one in the parts bin.

From Small Boat Restoration 2013

From Small Boat Restoration 2013

From Small Boat Restoration 2013

Drilled two pilot holes and installed #8 stainless screws.

From Small Boat Restoration 2013

If you need to order reproduction handrails for a Sailfish or Super Sailfish, check out our Sales page.

Fair Winds,
Kent

Sunfish Work Cradle and Sawhorses

We rebuilt the sawhorses that came with Zip using cedar, pine and cypress. They were on their last legs, no pun intended :)

From Small Boat Restoration 2013

From Small Boat Restoration 2013

We also made a cradle that would hold the sawhorses and a boat, that way we can move the boat from storage to work area to garage as needed.

From Small Boat Restoration 2013

From Small Boat Restoration 2013

Sunday, September 1, 2013

The Sunfish Shack

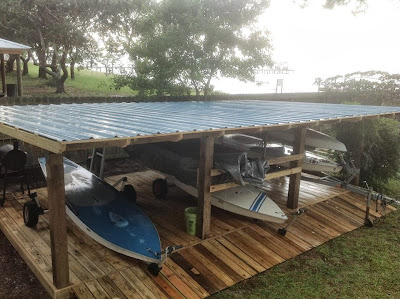
Renovated our sailboat shed, aka the Sunfish Shack. We changed the roof over to metal, added a deck and a ramp. The main function of the shed is to keep the pine needles, rain and sun(UV) off of the boats, keep them ready to go sailing without having to spend 30 minutes cleaning them up first. The old shed roof was lower, with plywood and shingles, and it leaked. The goal for shed 2.0 was to raise the front edge, lower the rear edge, remove excess roof support 2x6s, and add a deck with ramp to get trailers out of the mud that likes that shaded area.

From Small Boat Restoration 2013

Here is Shack 1.0, I designed the roof to be low so less rain would blow in, but there was not enough slope to shed the rain. As a result the water leaked through the shingles and soaked into the plywood, causing mildew and mold problems. Also water ponded underneath and the dirt turned to mud, so my intent to keep water AWAY from the stored boats had just the opposite effect :( Overall, it was a huge design failure and excess expenditure for materials, but I learned what Shack 2.0 needed. All of the old roof was cut off with a circular saw, I recommend using a dust mask and covering up exposed skin while doing that, I created lots of moldy sawdust!

From Small Boat Restoration

Salvaged lumber from Shack 1.0

From Small Boat Restoration 2013

From Small Boat Restoration 2013

The new shed has 3 stalls, big enough to hold Seitech dollies or our double stack trailer. The roof is MasterRib 29 gauge metal from Lowes placed on 2x4 rafters and 1x4 purlins. The front 2x6 roof joist was moved from lower on the front of the 6x6 post to the top and secured on both sides with metal hurrican ties. That raised the front of the roof. The rear joist was lowered the width of a 2x4 on the rear posts, leaving enough room for the rafters and roof to clear the top of the posts. I also added a few racks by screwing 2x4s to the posts to store our restoration project boats Chip (wooden Sunfish) and Zsa Zsa (Super Sailfish). These can be removed when the boats go into the restoration queue.

From Small Boat Restoration 2013

The wisteria likes the shed, it thinks it is one big trellis. I reused the 2x6x16s the front and rear roof joists and to frame the deck around the bottom of the posts. I had to buy the 2x4x16 rafters and 1x4 purlins to support and secure the metal roof, and reused hurricane ties to secure them to the joists. The roof is secured with a special metal roof washer and screw, screwed into the purlins. Since the roof is low I had to find a screw long enough to get fully into the 1x4 but not stick out under the roof and poke me in the head :)

From Small Boat Restoration 2013

I framed the perimeter of the posts with rescued 2x6s. Underneath the deck i used 2x4s and 12 inch square pavers to support the deck. The deck was made from salvaged 2x6x16s cut down to 12 feet, with the scrap end beveled and used for the front ramp. I ran out of old lumber and ordered 2x6x12s to finish the deck, but 2x8x12s were delivered instead. I adapted and the deck/ramp came out real nice. There is enough room under the front half of the Shack to work on projects!

From Small Boat Restoration 2013

From Small Boat Restoration 2013

From Small Boat Restoration 2013

From Small Boat Restoration 2013

The 2x4 deck joists are screwed into the 2x6 frame, I added some pavers mid span to prevent sag, although I don't plan to have much weight on the deck. I also leveled the dirt under the deck with sand to improve drainage. The deck is elevated off of the ground like a dock, so any heavy rain should run off behind the shack or is welcome to runoff underneath.

From Small Boat Restoration 2013

From Small Boat Restoration 2013

18 Mar 2015: Current state of affairs at the Shack. 3 fiberglass Sunfish, one wooden Sunfish and one wooden Super Sailfish.

From SBR 4: Jun 2014 -