Sunday, January 31, 2021

Bluff Ratty Punt SCUPPERS 31 Jan 21 Risers and Cove

 31 Jan 21:

Wrapped up the night before pondering scantlings for the seat risers.


We settled on 1 3/8th inch height for the seat risers, a good size for kids to grip. We cut 2 small cove details with the table saw, and rounded the edges with a 3/4 inch roundover bit. Also rounded the seat edges and cut the cove.


Saturday, January 30, 2021

1963 Alcort Sunfish CHIP 29 Jan 21 Floorboard

 29 Jan 21:

One of CHIP's floorboards went missing in Hurricane Sally surge, the other floated 300 feet up to the Carriage House, so we cut a new floorboard out of 1/4 inch marine grade plywood.


There is a small wooden cleat on the bottom that helps keep the floorboard from moving around. A note about floorboards, they can float away after a capsize, so dummy cords might be a good addition. 


The cleats are cypress, fastened with #8 x 1 inch silicone bronze Frearson Head screws, piloted and countersunk with combination Fuller bits. Bits and screws available from Jamestown Distributors.


Used Skipper's ratcheting bit brace and auger bits to drill the finger holes, the bit brace was her Grandpa Nelson's.


Both floorboards got a coating of TotalBoat WetEdge BlueGlo White with a Redtree Fooler double bristle Brush (also available from JD). During Sea Trials I found that the coating is slippery, so we will apply a coat to TotalTread once the base coat dries


Log of CHIP.

Lewis Bluff Ratty Punt SCUPPERS 28 Jan 21 Oarlocks and Board Stretcher

 28 Jan 21:

Main method of propulsion for the little punt SCUPPERS wil most likely be a punt pole. Secondary will be paddle, and we might try tiny oars. If so, we have some vintage Wilcox and Crittenden removable oar locks that we'd use. We only envision using SCUPPERS in water shallow enough for a punt, so that if we capsize we could just stand up and reboard the PV (Punting Vessel).

Okay we would attach them to the gunwale. Shown below on the hull just for size reference.


I had a dumb plan to rake the bow aft and cut too fast, that made the bow plank very deep. So I brought out the board stretcher and added 6 inches back, shown here stretching the hull.

Log of SCUPPERS.

Wilcox and Crittenden.

1950s Alcort Standard Sailfish WINNIE 28 Jan 21 Lines and Offsets

 28 Jan 21:

We took lines and offset measurements from our early Alcort Standard Sailfish with hopes of building a replica someday, and as a repair reference.

We measured half breadths, plank heights at Stations set in inches from stem to stern. At the stem we measured back 5, 10, 15 and 20 inches then every 10 inches past that for half breadths. The we also located the screws on the side planks that held internal cleats for the transverse frames and took measurement at those locations. We measured plank height as well as keel height. All measurements are to the outer edge of the 3/4 inch thick plank and 1/4 inch thick deck and hull, so frame measurements would have to deduct those thicknesses. 


The oldie but goodie measuring convention we used was Feet - Inches - Eighths. Example below 0-2-2 translates to a bow (stem) height of 0 Feet - 2 Inches - 2/8 Inches. 


Once measured, WINNIE found a comfy spot in the PODS container under SMEDLEY.


Among other projects, we are working on The Wooden Sunfish and Sailfish Owners Manual. Lines and Offsets will be included, plus build instructions. Patterns will also be offered.


Log of WINNIE.

Carriage House Update

27 Jan 21:

Current State of the Carriage House, the little punt SCUPPERS is under construction on the left and 1950s Alcort Standard Sailfish is in the House to get her offsets and lines taken before she goes into the PODS container. The Sunfish Finishing Dolly is rolled out onto the Medicine Wheel Deck.

Log of the Carriage House.

Hard To Find Alcort Rudder Releasing Mechanism Parts 1952 Patent

 27 Jan 21:

Here are a few hard to find parts from the rudder releasing mechanism that was used on Alcort Sunfish and Sailfish from 1953 to 1969. The 7+ inch carriage bolt is elusive, but not so much as the rudder pin with keeper chain. The original design had the keeper chain attached to the deck, and the pins tended to come loose during road trips and litter the shoulders of America's roadways. We like to attach our keeper chains to the rudder now and they ride in the car.


Here's a pin about ready to depart the pattern.


So if you're going through the closet and find bits that look like this, send us a comment!

FMI: Alcort Rudder Releasing Mechanism Patent 2,675,775

PODS Update - TRACKER and ZIP

 27 Jan 21:

The Super Sailfish TRACKER and 1953 Sunfish ZIP joined SMEDLEY in the PODS container, after the platform was finished.


Moving Part of the Armada with PODS

 26 Jan 21:

The Armada is changing Homeport from Gulf Squadron to Atlantic Squadron. Some of the boats will travel in a PODS container. Some have already been up to the Chesapeake and back once, due to Pandemic intervention. So they are Pros.

Last time we even had SMEDLEY's trailer tongue shortened so the trailer would fit.


Learning Lesson from the last shipment was that I don't tie good knots and some of the boats that I suspended sagged and were damaged. This time I'm building a platform over SMEDLEY with 2x4s and plywood decking.

1982 AMF Sunfish PHOENIX 26 Jan 21 Ready For Sea Trials

26 Jan 21:

We attached PHOENIX' deck edge trim with 1/8th inch diameter aluminum rivets that have a 1/8th inch grip (depth) range. On some boats you might find you need 1/4 inch grip. Check the top of the rivet for burrs afterwards and file as needed, those burrs are sharp and can snag skin or clothes.  Also when drilling the 1/8th inch hole for the rivet, be careful to not drill through the bottom edge of the trim, no hole is needed there, only enough depth to go through the flange on the deck edge. If the hole os accidentally drilled through, check that bottom edge for burrs also.

Our friend Alan sent us salvaged trim, cut into smaller pieces to make shipping economical. 


My brother Kirk's rivet gun, luckily we have the same initials. The Arrow brand rivets we got from Lowes, but there are also suppliers who sell OEM rivets for the Sunfish, Laser Performance does as the Manufacturer.


We used a piece of spare trim we had, cut it to length using a metal blade on a De WALT jigsaw. 


Rummaging for parts we came across this Alcort box, our friend Alan gave it to us, we think it had parts for a kit boat like screws and deck hardware.


We (I) applied 3M Fiberglass Restorer and Wax with a cheapo car buffer to the entire deck then polished it off with a towel and polishing pad. Our Sunfish Restoration Savvy friend Rodney, who repaired Sunfish at summer camps for many years, saw what I did on our facebook page and mentioned that we did it wrong.  (I) checked into it and sure enough I did it all wrong and was lucky I did not haze over the deck. The big clue should have been where it says One Step. So I got online and chatted with a rep at 3M and he sent the  label directions to me on pdf, as I was too lazy to walk out to the carriage house and get the bottle. I had been too lazy to read the direction for the 10 years I have been using it, and who can read that tiny print anyway? The correct ways to apply it are 1) by hand with a soft, clean cloth to a 1' x 1' area. Rub aggressively using short, straight strokes. Rub until the product is gone and do not allow product to haze. Or 2) by variable speed buffer/polisher set at 1400-2000 rpm equipped with a 3M Perfect-It wool compounding pad (PN 05753). Apply sufficient material to work 2' by 2' surface area. Before starting spread material around surface to prevent sling. Use light to medium pressure. Reduce pressure as material begins to dry.


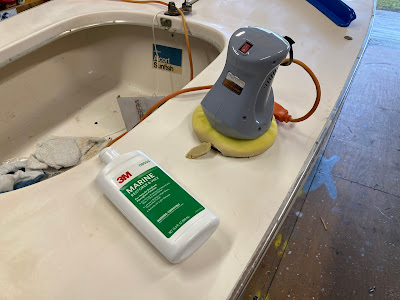
We don't normally wax the decks of Sunfish, especially around the cockpit, but PHOENIX's gelcoat was lightly oxidized and it needed to be refreshed. The wax brought the gloss up a bit to better match the repair area.


PHOENIX bids adieu to the Carriage House and WINNIE has already rolled in to have her lines and offsets taken.


Sunfish Shack Back In Order video: https://youtu.be/MTPsk-aCl2M

Log of PHOENIX.

Tuesday, January 26, 2021

Preval Sprayer Missing

 25 Jan 21:

Skipper commandeered the Preval sprayer and pressed it into service spraying her 3D house. It worked great spraying some Apple Barrel White Latex, over gray primer. We like the sprayer a lot, might try some varnish next, but not on Skipper's house.

Lewis BLUFF RATTY v0.1 SCUPPERS 25 Jan 21 Bow Bits and Sheer Planks

 25 Jan 21:

While we were watching paint dry on PHOENIX we fastened the correct length sheer planks to SCUPPERS with THIXO Wood and silicone bronze screws. We also attached the stern, and trimmed the small frames and seats to fit.


Log of SCUPPERS.

1982 AMF PHOENIX 25 Jan 21 Stripes and Stickers

 25 Jan 21:

Lots of taping and striping and stickering on PHOENIX today, we'll go through it, try to keep up...We taped around her coaming with 3M 218 Fine Line tape and put down some poly sheeting.


Taped off the bow stripes, to spray the Royal Blue stripes first. We used the old stripe edgees as a guide for the tape, and eyeballed the spacing on the new area, if it looks right... 


Waiting for Skipper to spray Rust-Oleum, I applied the new vinyl AMF on the port side. The New Old Stock Sunfish sticker was applied a few days ago.


Peeling stickers and stripes is always fun!


Skipper sprayed about 4 coats of Rust-Oleum Sail Blue, waiting for each coat to tack before the next coat. She lapped the yard and made some Scooby snacks between coats.


The Sail Blue is sprayed, we let it dry for about 4 hours then got to the red.


Oops, didn't get one area taped down enough, that spot removed easily with a little TotalBoat Special Brushing Thinner.


Spray paint will not fill aged gel coat stress cracks, if those bug you you'll need to file them out a bit, fair, sand, prime and sand before paint. Then go out and run into a dock and create all anew.


Tape removed from red stripe, and starboard side AMF and Sunfish sticker applied.


The stern stripes and the rest of the deck will get some TLC with 3M Fiberglass Restorer and Wax, we did a test patch here and it will definitely brighten up the hull to match the shiny new bow bits.