 |
| From SBR 4: Jun 2014 - |
Wednesday, November 26, 2014
Scarf Joint Clamps
Made some clamps that can reach around the stringer to put light pressure on the scarf joint when we glue it up. Cut them out of a 2x6, made one a bit longer so it can reach further.
Thursday, November 20, 2014
SBR Tool Cart
St Jacques checking out "Shadow" the Tool Cart. I made the cart 30 inches high so it can sit level with our folding work table. The top tray is also measured to hold a chop saw. The cart is 18x24, and it will store neatly in several areas of the garage. Harbor Freight 5 inch wheels were $6 each, half a sheet of 3/4 inch plywood $13, plus lag bolts, washers and wood screws. If I build another, I will probably use 1x4 lumber, wasn't real happy with the quality of the plywood and how it split along some edges.
Hand tools and battery powered on the top, wired on the bottom.
Hand tools and battery powered on the top, wired on the bottom. Plus my "box o bolts"...."sacks of screws?"
 |
| From SBR 4: Jun 2014 - |
Hand tools and battery powered on the top, wired on the bottom.
 |
| From SBR 4: Jun 2014 - |
Hand tools and battery powered on the top, wired on the bottom. Plus my "box o bolts"...."sacks of screws?"
 |
| From SBR 4: Jun 2014 - |
Sunday, November 16, 2014
ODay Widgeon Sailboat
Our friend Murray sailing his ODay Widgeon.
Murray takes Kent for a paddle sail.
 |
| From SBR 4: Jun 2014 - |
Murray takes Kent for a paddle sail.
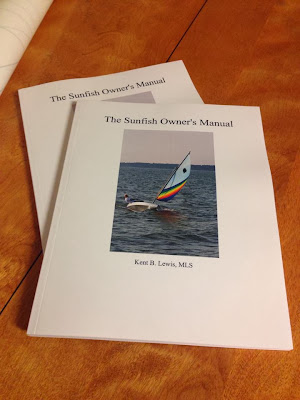
The Sunfish Owner's Manual by Small Boat Restoration
We published The Sunfish Owner's Manual in December 2013, 144 pages of info with 230 color photographs, featuring both fiberglass and wooden Sunfish.
The Sunfish Owner's Manual is a one stop resource for the world's most popular sailboat. Inside there are chapters on the History of the Sunfish, and illustrated chapters on how to Buy, Rig, Sail, Maintain, Restore, Store, Transport and Sell the Sunfish. The Restore Chapter includes Do It Yourself pictures and step by step details on how to conduct common repairs, including flotation foam replacements and rudder conversions. The Manual has an extensive Illustrated Glossary of Sunfish and sailing terms, with 230 photos by the author, taken in the course of numerous Sunfish restorations, for both wooden and fiberglass Sunfish as well as Sailfish. Included are weblinks to top Sunfish information sites, part suppliers and social network sites. There are also links to extended web content located on the author's youtube channel and over 1300 Picasa Web images. The Manual is not only a one stop reference for any Sunfish owner, it would be of interest to owners of other small sailboats as well.
The most entertaining chapter is the Illustrated Glossary, it includes all the nautical and Sunfish terms you need to know.
Get your copy today through Amazon books. As soon as you order it they print it and ship it! https://www.amazon.com/Sunfish-Owners-Manual-Maintain-Repair/dp/1484987217
Enjoy, and thanks for reading!
Fair Winds,
Kent
30 May 2014: 75 copies if The Sunfish Owner"s Manual have sold so far, new Second Editions showed up today. They include an added boat yard safety section and expanded Resources chapter.
07 Jul 2014: 100 Copies sold!
19 Jul 2014: 125 copies sold!
03 Aug 2014: 150th copy sold! Lots of good feedback on the facebook Small Boat Restoration page and Sunfish Forum Most recent questions are about painting, and that is covered in the Manual.
19 Oct 2014: 200 copies sold!
04 Dec 2018: Over 500 copies aold, thanks for the great support! Makes a great holiday gift :)
Thanks for buying The Sunfish Owner's Manual, and Fair Winds to our fellow sailors,
Kent and Audrey
Click here to buy The Sunfish Owners Manual
 |
| From SBR 2013 |
The Sunfish Owner's Manual is a one stop resource for the world's most popular sailboat. Inside there are chapters on the History of the Sunfish, and illustrated chapters on how to Buy, Rig, Sail, Maintain, Restore, Store, Transport and Sell the Sunfish. The Restore Chapter includes Do It Yourself pictures and step by step details on how to conduct common repairs, including flotation foam replacements and rudder conversions. The Manual has an extensive Illustrated Glossary of Sunfish and sailing terms, with 230 photos by the author, taken in the course of numerous Sunfish restorations, for both wooden and fiberglass Sunfish as well as Sailfish. Included are weblinks to top Sunfish information sites, part suppliers and social network sites. There are also links to extended web content located on the author's youtube channel and over 1300 Picasa Web images. The Manual is not only a one stop reference for any Sunfish owner, it would be of interest to owners of other small sailboats as well.
The most entertaining chapter is the Illustrated Glossary, it includes all the nautical and Sunfish terms you need to know.
Get your copy today through Amazon books. As soon as you order it they print it and ship it! https://www.amazon.com/Sunfish-Owners-Manual-Maintain-Repair/dp/1484987217
Enjoy, and thanks for reading!
Fair Winds,
Kent
30 May 2014: 75 copies if The Sunfish Owner"s Manual have sold so far, new Second Editions showed up today. They include an added boat yard safety section and expanded Resources chapter.
07 Jul 2014: 100 Copies sold!
19 Jul 2014: 125 copies sold!
03 Aug 2014: 150th copy sold! Lots of good feedback on the facebook Small Boat Restoration page and Sunfish Forum Most recent questions are about painting, and that is covered in the Manual.
19 Oct 2014: 200 copies sold!
04 Dec 2018: Over 500 copies aold, thanks for the great support! Makes a great holiday gift :)
Thanks for buying The Sunfish Owner's Manual, and Fair Winds to our fellow sailors,
Kent and Audrey
 |
| From Lewis 2013 |
Click here to buy The Sunfish Owners Manual
Saturday, November 15, 2014
Tarratine Yacht Club 1955
Our friend Joe Spalding sent us an article about working at the Tarratine Yacht Club in the Summer of 1955. TYC is located on Dark Harbor, Maine. The article was originally published in Messing About In Boats Sep 1, 2006.
Click here to view the article.
Click here to view the article.
Little Gray Boat Hagerty Sea Skiff
Our friend Joe Spalding sent us an article on a Hagerty Sea Skiff that he built in 1952. The story also includes some recollections of his time building Sailfish for Alcort in Waterbury, CT.
Please follow this Hagerty Sea Skiff link to view the pdf.
Please follow this Hagerty Sea Skiff link to view the pdf.
 |
| From SBR 4: Jun 2014 - |
Friday, November 14, 2014
Sailing Canoe
Captain Jack's sailing canoe. Sail is a Sunfish sail cut down to 65 square feet.
 |
| From SBR 4: Jun 2014 - |
 |
| From SBR 4: Jun 2014 - |
Tuesday, November 11, 2014
Simply Messing About In Boats
From "The Wind In The Willows" the 1908 children's book by Kenneth Grahame: "Believe me, my young friend, there is NOTHING—absolute nothing—half so much worth doing as simply messing about in boats.....about in boats—or WITH boats, .....In or out of 'em, it doesn't matter. Nothing seems really to matter, that's the charm of it. Whether you get away, or whether you don't; whether you arrive at your destination or whether you reach somewhere else, or whether you never get anywhere at all, you're always busy, and you never do anything in particular; and when you've done it there's always something else to do, and you can do it if you like, but you'd much better not."
 |
| From SBR 4: Jun 2014 - |
Saturday, November 8, 2014
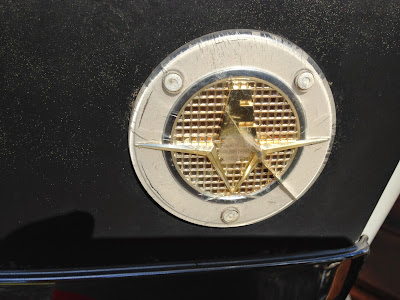
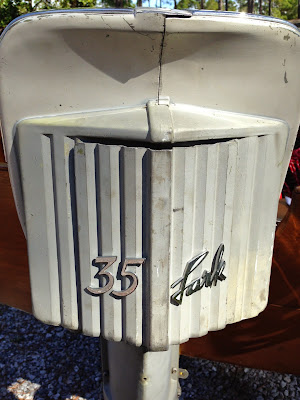
1958 Evinrude Lark 35hp
Picked up a 1958 Evinrude Lark 35hp. ConditionTBD, all we know is that it is a freshwater motor from the St Clair area.
 |
| From November 8, 2014 |
 |
| From November 8, 2014 |
 |
| From November 8, 2014 |
 |
| From November 8, 2014 |
 |
| From SBR 4: Jun 2014 - |
 |
| From SBR 4: Jun 2014 - |
 |
| From SBR 4: Jun 2014 - |
Friday, November 7, 2014
Small Boat Restoration Logo
We designed our logo, the sails represent our Drascombe Lugger, ODay Daysailer and Sunfish.
 |
| From SBR 4: Jun 2014 - |
Wednesday, November 5, 2014
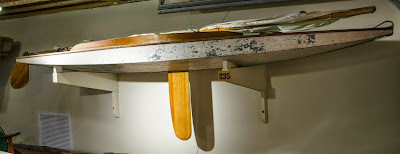
First Sunfish by Alcort
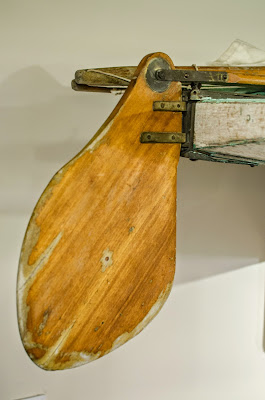
The first Sunfish sold by Alcort is located at the Lake Champlain Maritime Museum. It was purchased by Dr E. A. Morton at the NY Boat Show and delivered to Brlington, VT. It spent most of its life on Lake Champlain and was donated 4-5 years ago by Richard Norton of St Albans. It is in original condition except for a few repaintings and a daggerboard repair.
Pictures courtesy of the Lake Champlain Maritime Museum.
Pictures courtesy of the Lake Champlain Maritime Museum.
 |
| From SBR 4: Jun 2014 - |
 |
| From SBR 4: Jun 2014 - |
 |
| From SBR 4: Jun 2014 - |
 |
| From SBR 4: Jun 2014 - |
 |
| From SBR 4: Jun 2014 - |
Tuesday, November 4, 2014
Mystic Seaport John Gardner Boat Shop Stool
I saw a shop stool in the John Gardner Boat Shop at Mystic Seaport and wanted to make one for our shop. It will be helpful to reach some top shelf items, pegboard over the sink and in a pinch could double as a moaning chair.
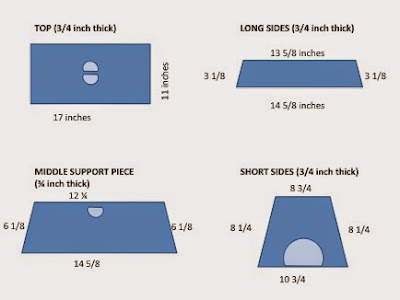
I contacted the Museum and one of their staff was kind enough to take measurements from their stool and send them to me.
Ran up to Lowes and picked up a piece of 1"x12"x8' Select Pine. Looks like I have some other pending projects waiting patiently in the back of the Edge....
Drew the line for the 17 inch wide top first.
Cut the top with a circular saw. This project is small enough that you could use a set of cordless tools.
Traced lines for the legs.
Traced lines for the sides.
Traced lines for the center support and used sides to help draw the correct angle. The plan measurements are a bit off for the center support top width.
I measured the picture of the stool to get a general idea of how wide and tall the arch is on the legs.
The hand hold on top is just over 4 1/2 inches in diameter. I used the cap from a 5 inch inspection port to get the approximate size.
I grabbed my level to draw the hand hold cross bar, but I ended up trimming it later as it was too wide. What I used the second time was a scrap piece of the 1x lumber, that gave me the width to match the center support below.
I used the cap from a 6 inch port to get the approximate arch for the legs.
Drilled a 1/4 inch starter gole for the jigsaw blade.
Cut out the top handhold and also cut out a section of the center support with a jigsaw.
Cut out the leg arch with a jigsaw and then used leg 1 as a pattern for leg 2.
Dry fitting the pieces to see if the support angles and widths match up. I did not cut any bevels on the legs or supports as the angle formed between the legs and top is negligible.
Drilled pilot holes and counterbor for the screws and then assembled the base.
Used a router bit to round over the edges of the stool. The piece feels better this way, and you get rid of sharp edges that can gouge.
I centered up the top and traced around the base. Then I set the base upright, flipped the top and used a tape measure to make sure top was centered up again. That way I had a idea of where the edges of the base were when I drilled pilot holes for the screws.
Finished up the assembly with #8 1 1/2 inch brass screws. Here are the tools and materials that I used.
Assembly finished, waiting for paint.
I need the stool so I can reach the keel of the Penobscot 14 with a plane and bevel the keel.
The stool could also be used to carry a few tools to the job site.
First coat of Interlux Fire Red.
Did some operational testing and found out the end arch is just big enough for a toe hold, handy to reposition the stool.
Put the stool back into the shop, rounded the corners and put on the second coat of Interlux Fire Red.
The project took about 2 hours, not including the trip to Lowes.
Paint splatters next? Nope, we'll let it develop its own patina :)
Fair Winds,
Kent
| From SBR 4: Jun 2014 - |
I contacted the Museum and one of their staff was kind enough to take measurements from their stool and send them to me.
 |
| From SBR 4: Jun 2014 - |
Ran up to Lowes and picked up a piece of 1"x12"x8' Select Pine. Looks like I have some other pending projects waiting patiently in the back of the Edge....
 |
| From SBR 4: Jun 2014 - |
Drew the line for the 17 inch wide top first.
| From SBR 4: Jun 2014 - |
Cut the top with a circular saw. This project is small enough that you could use a set of cordless tools.
| From SBR 4: Jun 2014 - |
Traced lines for the legs.
| From SBR 4: Jun 2014 - |
Traced lines for the sides.
| From SBR 4: Jun 2014 - |
Traced lines for the center support and used sides to help draw the correct angle. The plan measurements are a bit off for the center support top width.
| From SBR 4: Jun 2014 - |
I measured the picture of the stool to get a general idea of how wide and tall the arch is on the legs.
| From SBR 4: Jun 2014 - |
The hand hold on top is just over 4 1/2 inches in diameter. I used the cap from a 5 inch inspection port to get the approximate size.
| From SBR 4: Jun 2014 - |
I grabbed my level to draw the hand hold cross bar, but I ended up trimming it later as it was too wide. What I used the second time was a scrap piece of the 1x lumber, that gave me the width to match the center support below.
| From SBR 4: Jun 2014 - |
I used the cap from a 6 inch port to get the approximate arch for the legs.
| From SBR 4: Jun 2014 - |
Drilled a 1/4 inch starter gole for the jigsaw blade.
| From SBR 4: Jun 2014 - |
Cut out the top handhold and also cut out a section of the center support with a jigsaw.
| From SBR 4: Jun 2014 - |
Cut out the leg arch with a jigsaw and then used leg 1 as a pattern for leg 2.
| From SBR 4: Jun 2014 - |
| From SBR 4: Jun 2014 - |
Dry fitting the pieces to see if the support angles and widths match up. I did not cut any bevels on the legs or supports as the angle formed between the legs and top is negligible.
| From SBR 4: Jun 2014 - |
Drilled pilot holes and counterbor for the screws and then assembled the base.
 |
| From SBR 4: Jun 2014 - |
Used a router bit to round over the edges of the stool. The piece feels better this way, and you get rid of sharp edges that can gouge.
| From SBR 4: Jun 2014 - |
I centered up the top and traced around the base. Then I set the base upright, flipped the top and used a tape measure to make sure top was centered up again. That way I had a idea of where the edges of the base were when I drilled pilot holes for the screws.
| From SBR 4: Jun 2014 - |
Finished up the assembly with #8 1 1/2 inch brass screws. Here are the tools and materials that I used.
| From SBR 4: Jun 2014 - |
Assembly finished, waiting for paint.
| From SBR 4: Jun 2014 - |
I need the stool so I can reach the keel of the Penobscot 14 with a plane and bevel the keel.
| From SBR 4: Jun 2014 - |
The stool could also be used to carry a few tools to the job site.
| From SBR 4: Jun 2014 - |
First coat of Interlux Fire Red.
 |
| From SBR 4: Jun 2014 - |
Did some operational testing and found out the end arch is just big enough for a toe hold, handy to reposition the stool.
| From SBR 4: Jun 2014 - |
 |
| From SBR 4: Jun 2014 - |
Put the stool back into the shop, rounded the corners and put on the second coat of Interlux Fire Red.
| From SBR 4: Jun 2014 - |
The project took about 2 hours, not including the trip to Lowes.
Paint splatters next? Nope, we'll let it develop its own patina :)
Fair Winds,
Kent
Subscribe to:
Posts (Atom)

