


We float tested CHIP and he leaked. I planned to remove the bottom for repairs and to take measurements, but got distracted by life and 20 other boats, so we put him in storage until we could get to him. Fast Forward to 2018.
01 May 18:
We moved boats around today, the Dabber is finished so there is space in the Carriage House for the SUper Sailfish ZSA ZSA and the wooden Sunfish CHIP. CHIP has been stored for 5 years, patiently watching other projects come and go and it is her turn now, we will be able be taking lines off of both boats and repairing the plywood bottoms, then fair, sand, prime and paint.
Skipper pulled the finishing dolly around to the Sunfish Shack so we could retrieve CHIP.
I was going to try and wedge CHIP out of the storage rack with the dolly set to the side, but Skipper suggested just putting the dolly under CHIP and removing the rack crossbars instead. Brilliant! CHIP gently lowered down onto the dolly, a little worried about the recip saw but that was used to cut away the crossbars.


So now we have the Super Sailfish ZSA ZSA and wooden Sunfish CHIP together again, ready for bottom work.

We also moved the Catfish SMEDLEY up front, so we can work on all 3, repairing the hulls, sanding and cleaning up gelcoat.

05 May 18:
Removed the bottom from CHIP, cut the outer edge loose with a reciprocating saw and then peeled the panels up with a crow bar.

The scarf joint was pretty interesting, kind of a lap joint.


06 May 18:
Started taking the lines off of the Sunfish, used Alcort Super Sailfish plans as a guide to figure out what measurements we need. Today we measured the length, deck width and found the Stations (frames) in inches. Most measurements are 1/16th, but there are a few 1/32.

Stations in inches, with Station 0 at the bow. The offsets will be in Feet-Inches-Eighths.

Also measured the width of the deck every 5 inches from the bow out to 20, then every 10 inches to develop Half Breadths. Gathered measurements on stringers, cleats and keel and deck beam (upper and lower longeron).


07 May 18:
Verified that there is a gap between the frame and the deck/hull.

Took measurements from the frames.


09 May 18:
CHIP will have a V shaped coaming, this one will be used as a pattern and we'll cut a new one from mahogany or cypress.

We also have a really nice rudder, it needs the shorter vertical plate because the wooden Sunfish have the short transom like the Sailfish.

10 May 18:
We have plans for the Alcort Super Sailfish and are using those as a guide to gather measurements from CHIP. To validate our measurements we will make patterns of the frames and other key components.
The frame measurements include width, outside height and inner height. There are also measurements for the longeron cutouts and lightening holes. We also took another measurement of spacing between the deck and keel longeron, to account for the keel bevel.

Cut not one, not two, but 3 frames to get one that fit for Frame 17 (17 inches aft of the bow). The problem was with my line drawing, not the measurements.

Checked the outer height then worked on the outer edge bevel. It is important to measure the frame to the widest face, which is the aft face on the forward frames. Then there is material left for a bevel.

Crosshchecked the measurements and transferred information to the pattern for frame 17.

We're happy with the pattern!


03 Jan 19:
Prepositioned the Alcort Super Sailfish ZSA ZSA out to the Sunfish Shack for Sea Trials, borrowed Sunfish PHOENIX's dolly. Skipper suggested rigging another hoist using Sunfish eyestraps, sheet, halyard block and halyard cleats. ZSA ZSA will find a permanent spot in the collection after Sea Trials.

1965 Alcort Sunfish CHIP moved from the temporary dolly onto the Finishing Dolly.


11 Jan 19:
Picked up 2 sheets of 1/4 inch marine grade plywood for CHIP's bottom. A/B Fir.

15 Jan 19:
We took measurements of the frames a while back, today we thought we'd try out making a tape pattern of one of the frames with blue tape.

Worked pretty good, now we can trace it onto some plywood for a restoration pattern. We'll use that top, center cleat notch to orient the pattern when we flip it to trace the mirror side. The plywood is not marine grade, the Skipper picked out some nice, pre-sanded 2x4 pieces at Lowes. We like the smooth feel of this type plywood for patterns, it cuts nice and the edges sand well.

Holler at us if Frame 2 on your wooden Sunfish needs to be replaced :)
17 Jan 19:
Traced the stem, keel longeron and planks.


19 Jan 19:
We received some free goodies from Jamestown Distributors to try out on CHIP. We will use the TotalBoat THIXO thickened epoxy to fasten the new plywood bottom, dispensed from a caulk gun to make the job go quick. JD also sent some of their new Elixir paint to try out, Fire Red for CHIP's hull, to be applied over the gray primer. I'm most excited about the soap and water cleanup for the paint! If the Elixir red is close to the brilliance that their WetEdge was, we have a winner. The cap and bag storage should help the leftover paint to last longer too. We also got some aluminum paint, in case we need to paint SCOUT again any time soon.

JD always adds free cups, stir sticks and latex gloves to the order, TotalBoat ships free in the US with a small surcharge sometimes for hazmat.
21 Jan 19:
Laid out the tape patterns on plywood, cross checked measurements and traced the edges.

The red X areas are where stringers and longerons are placed, those areas will be cut out.

Tried the pointy stick method next. It worked pretty good. Best method would be to use hot glue per Scott's suggestion, but I wanted to be able to reuse the sticks, 7 more frame patterns to go.

We took measurements a while back, and we are checking them against the patterns. For example, we measured the width of the frame in the boat as 3-5-6, decoded as 3 feet, 5 inches and 6 eighths. Then we checked the pattern to see if it was close. It was, so we proceeded. Where anything was off than more than a 16th of an inch we resolved the difference, sometimes the measurement was off, sometimes the pattern, sometimes both a little. The reality is that the frame does not have to be perfect, what is used to fair up the lines are the cleats that the sides, top and bottom are screwed to. Those can be moved in and out a bit, in fact we don't want the frames tight against the inside of the structure so that water doesn't get trapped in a compartment.

Nice sunset tonight.

22 Jan 19:
Our friend Chris had a great tip about using business cards to take the edges for patterns. We tried it out and it worked great. Worked on the transom and the frame just ahed of it.


About half the frame patterns are done.


01 Mar 19:
Finished the frame patterns, back to work on our 1963 wooden Alcort Sunfish CHIP. We picked this chippy boat up at OLDE TYME MARKETPLACE in Marshville, NC in 2013, CHIP is finally getting some attention!
Alcort INC, makers of Sailfish and Sunfish. It took me years to notice that the logo had both boat's logos on it. Serial number 11501 makes CHIP a 1963.

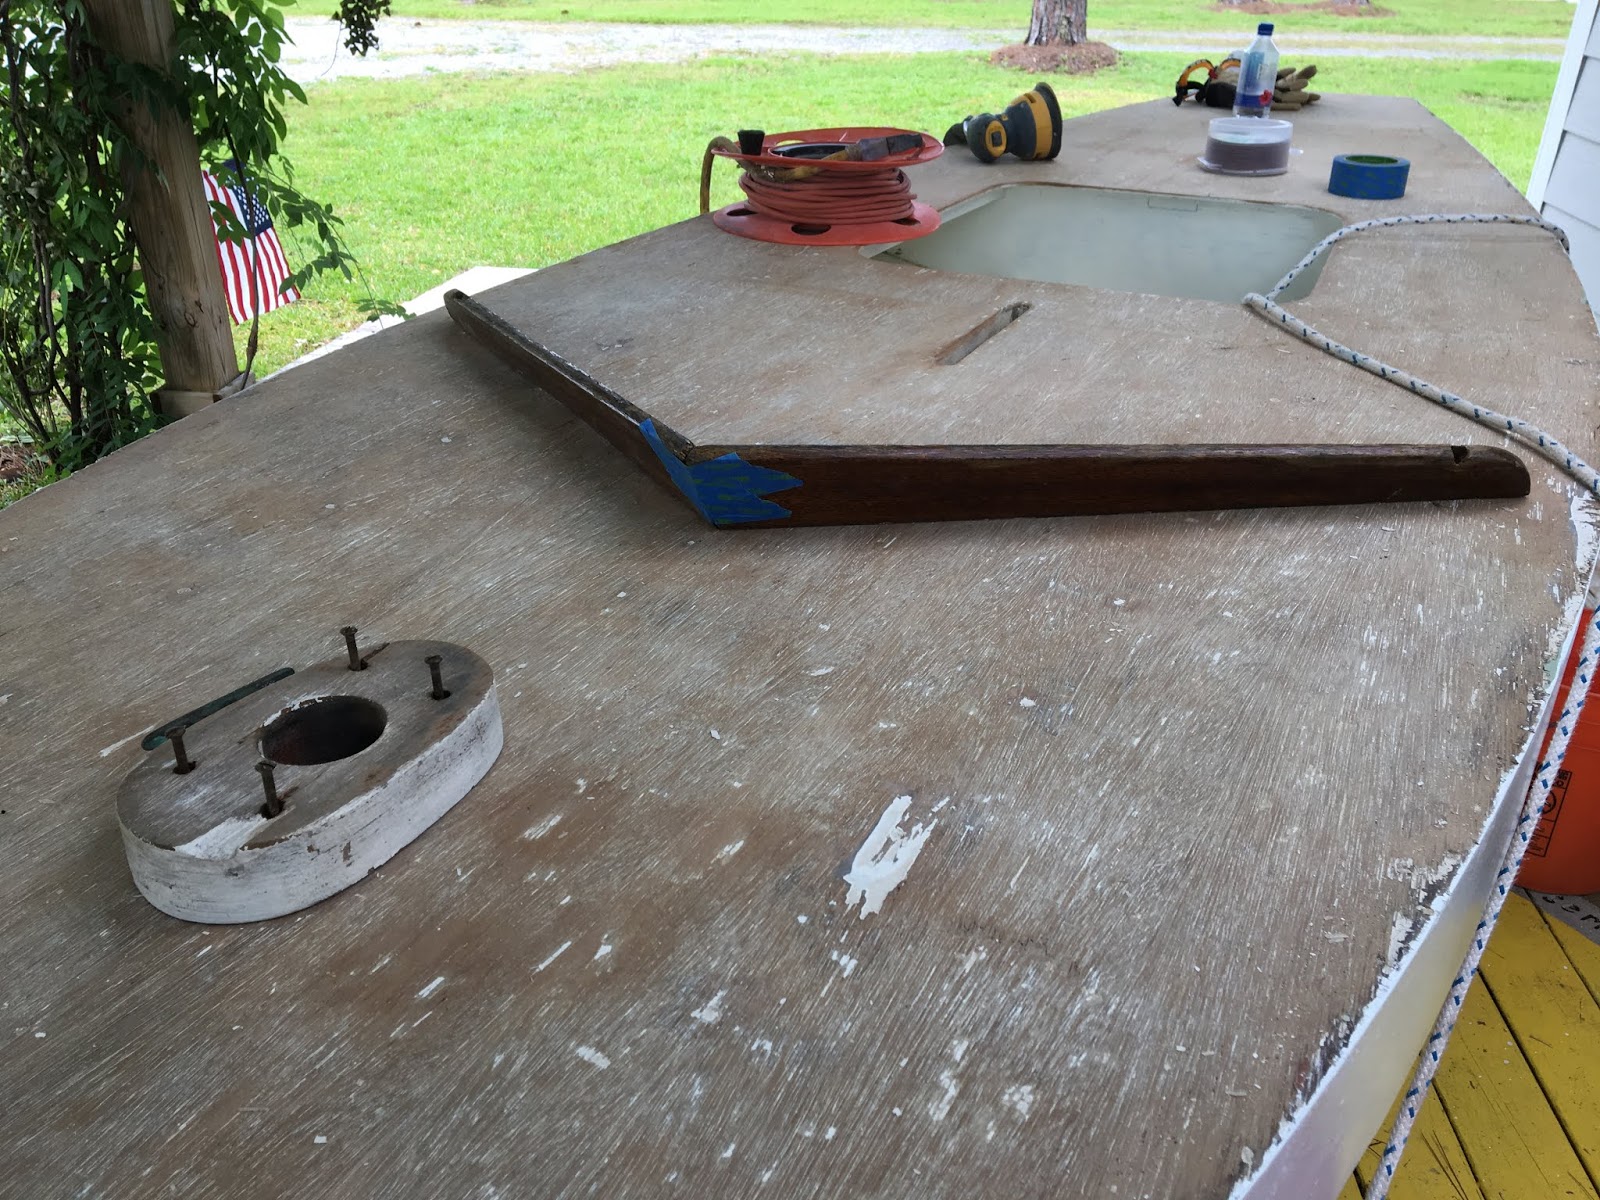
For measurements we wanted CHIP to be deck up, a nice flat surface for the tape measure and straight edges.

This horizontal hinge plate is the wrong part, the proper part for a wooden boat would have little ears on either side for screws back by the transom. The old screw holes are visible. We have the proper part! And check out the lonely keeper chain for the hinge pin, another pin lost on the shoulder of the road somewhere.

Popped out the wood plugs and removed the screws for the mast collar. We need a flat deck to measure the boat and we also need to reseal the mast step.

Interesting stripes underneath.

The official term for the bow is "chowdered up." But we can see where the starboard side plank overlaps the port side plank. Just behind the planks are the inner stem, the point of the stem is Station 0 for measurements, because the frames have to be put in place and stem, transom and deck/keel beams attached before the planks.

Taking a line from the aft face of the frame from the bottom up to the deck. This frame is one of the 3/4 inch frames on the cockpit bulkheads, the others are 1/4 inch thick. Because of how the side curve and how the frames are beveled, we took lines to the aft face of the frames for those frames that are forward of the widest beam. Aft of the widest beam the lines are taken to the forward face of the frames.

For our lines we are using the Feet-Inches-Eighths (+/-) format. As an example this measurement is 4 feet, 3 and 1/8 inches or 4-3-1. If it is a little over or under then the (+) or (-) is added.

Going to need some coffee for this! First Station, 1-5-2, aka Station 17.

We brought the frame face line up to the deck on both sides, ran a straight edge across, then measured inches aft from the stem, deck width and side height. Where we didn't have a frame, we lined up the square as a reference for the tape.

Stations, Breadths and Heights.

Position of daggerboard trunk.

Position of mast step.

Hiding under the deck panel is the point of the stem. The planks, deck beam, deck panel, keel beam and bottom panels attach to the stem. The frames attach to the deck and keel beams, so we use the point of the stem as the zero inch point of reference to measure where to place the frames.

03 Mar 19:
Metal De Persia bailer screw cap. They seize up enough on their own, without help from a coat of paint. First Gen Sunfish did not have a bailer, that might have been the best tack.

Cross section of a DePersia bailer, bow od boat to right. The knurled cap is supposed to be unscrewed while the boat is underway and let water be pulled out of the cockpit by venturi.

Old hull panels used as patterns. There was extensive checking (flaking) in the plywood. These are the aft sections.

Lined up 2 layers of 1/4 inch marine grade Douglas Fir plywood and used hull panels as a pattern. These are the forward panels.

Cut the ply with a DeWalt jigsaw. Stayed just about 1/8th inch outside the line on the outside edge and we'll plane that down once the panels are fit on the boat. The inner edge we cut to the line.

We beat the rain! For our Northern friends, that green stuff is called grass. 74F today.

Keel strip is rabbeted to cover and protect the edge of the hull panels. We'll make a new one.

The Supervisor flew by to check on things.
2 pieces of 4x8 plywood required to make the 4 bottom panels. Next we need to cut the scarfs to join the panels together. They will be attached with thickened epoxy and silicone bronze ring shank nails.

Put a barrier coat of TotalBoat WetEdge on the interior of the Douglas Fir plywood. That interior face is where any wayward moisture would end up and the open grain needed to be finished to protect against moisture. Used a Mighty Mini roller kit and Redtree Fooler double chip brush to carefully smear the paint around, a flood coat. All supplies available from Jamestown Distributors.

1963 wooden Sunfish had a V shaped coaming, aka the Mustache, cut from mahogany. Attached through the deck with screws at the end. Held together in the middle by a cool bronze bracket made by Wilcox and Crittenden Co, Inc.

1963 wooden Sunfish had a V shaped coaming, aka the Mustache, cut from mahogany. Attached through the deck with screws at the end. Held together in the middle by a cool bronze bracket made by Wilcox and Crittenden Co, Inc.

25 Mar 19:
Sealed up some screw and nail holes with TotalBoat THIXO (Thickened Epoxy).

Also built back up some shallow areas on the keel longeron at the bow and daggerboard trunk and sealed up the inside faces of the daggerboard trunk and mast step.

Next up we'll scarf the bottom panels in prep for installation.
10 Apr 19:
Worked on the bottom panels and keel strip for CHIP. For an 8:1 scarf on 1/4 inch plywood mark a 2 inch scarf line (8 x .25 = 2). The end of the panel is then planed to a slope, with a feather edge on the end up to full thickness at the 2 inch line. And since we want this stern panel scarf to fit underneath the bow panel scarf, we cut the scarf on the top face of the panel as we look at it. For the bow panel, we cut the scarf on the underside face.

120 grit belt on a Black and Decker belt sander a Stanley #5 jack plane to cut the scarfs into the 4 bottom panels. We lined them up on the 2 inch marks and cut the slope, looking for the ply glue lines as we shaved wood away. The goal is to get them as evenly spaced as possible, with the big picture being that the panels are being glued together. and no one will see that part while you are hiking out.

Cut 3/4 inch bottom panel centering strips from pine on the Ryobi table saw. They are sized to fit in the center notch on the keel strip centering jig. The weathered piece above the calipers is the old keel strip, used as a guide to find measurements for the centering strips and new keel strips. The strips are in two pieces, one to fit ahead of the daggerboard and one behind, and that means they can also be cut from an 8 foot piece of lumber. In ohter news Push Stick v1.0 is holding up pretty well.

Attached centering strips temporarily with #10 silicone bronze screws, drilled the pilot hole with a Fuller combination pilot hole and countersink bit. Those bits are tapered and work well for the softer silicone bronze screws, the same ones we'll use to permanently attach the keel strip. Bottom panels will be fit, glued and nailed, then centering strips come out and permanent keel strips wit overlapping edge attached. And the Kobalt drill and impact driver have held up well, we especially like the impact driver to put these screws in. Battery life has been great for our projects.

Attached centering strips temporarily, panels will be fit, glued and nailed, then centering strips come out and permanent keel strips wit overlapping edge attached. Keel strip is on the left, you can barely make out the T shape where the strip will nestle between and overlap the panels.

30 APR 19:
A video of some of today's fun.
We made a couple of errant cuts when we sliced the bottom off of CHIP with a reciprocating saw, so it is time to repair those areas. The cuts are on the cockpit bulkheads, and those need to be watertight. We used TotalBoat THIXO thickened epoxy to fill the void.


We grabbed some painter's paper and made patterns from the bottom panels. Also marked the location of the stringer screws.


Side plank pattern.


Marked location of stringers and stringer screws.

On the aft panel pattern we also marked the location of the bulkheads, the panel gets nails there also.

Made patterns for the floorboards.


Current state of affairs in the Carriage House, 2 wooden Sunfish, 1 wooden Standard Sailfish, 1 KM Paddleboard and a keel longeron for a Pascagoula Catboat.
01 May 19:
Primed the cockpit with TotalBoat Topside Primer.


06 May 19:
Trimmed edges of bottom panels. Attached with TotalBoat THIXO dispensed from a High Thrust caulk gun. Marked nailing lines and nailed with 3/4 inch silicone bronze ring shank nails.


Removed centering strip before adhesive dried and installed keel strip with THIXO and silicone bronze wood screws.

Cleaned excess epoxy with a paint stir stick.

Used marking jig to mark pilot holes for the silicone bronze ring shank nails.

Laid out the panels for the best fit, put on some alignment marks, then flipped them over to apply the THIXO.

Scarf joint 8:1, 2 inch offset on 1/4 inch plywood.


Rolled on a coat of TotalBoat Topside Primer.

07 May 19:


08 May 19:
Jamestown Distributors sent us some TotalBoat Topside Primer and WetEdge BluGlo White for CHIP. We also go some roller covers, roller frame and an Arroworthy tip brush. Plenty of paint sticks and paint cups!


25 May 19:
Cut fairings for the daggerboard slot from 1/4 inch plywood. Fastened with silicone bronze nails and Pettit Flexpoxy.


Take a ride on the dolly with dolly cam!
TotalBoat Topside Primer rolled with a Mighty Mini roller.


27 May 19:
Rolled CHIP outside for a bit because we can, and run some 120 grit over the primer.

Okay, in the daggerboard slot there was epoxy squeeze out and overlap from the new bottom panels. So we trimmed the bulk of it our with the DeWalt jigsaw, just carefully ran the blade flush along the inside of the trunk. Then shaped the curved ends of the slot with a ceramic tile file that has a half round side on it.


Penciled in the lines for the paint design, circa August 1949 LIFE Magazine.


Painted the boaw and stern with WetEdge Flag Blue. It went on smooth and covered well, but it is too dark to match the sail we are going to use.


First coat of TotalBoat WetEdge BluGlo White, brushed on with an angled sash brush. Thinned 5%.

Found a better color blue, Interlux Brightside Largo Blue, thinned 5% and brushed on.


02 Jun 19:
Flipped CHIP, ready for deck paint. Ser No. 11501 = 1963.


40 grit on a DeWALT random orbital sander to get rid of the paint and primer remnants. Hooked up the shopvac with a HEPA filter to capture most of the dust.

Found the location for the splashguard.

Made a template to record splashguard locations and a pattern of the splashguard.

While the sander was out we cleaned up the daggerboard, mast step and splashguard.

Primed the deck with TotalBoat Topside Primer. We had a partial can of gray and 2 cans of white, so we mixed the white with a can of gray to stretch it.

Laid out the deck graphics and made a pattern.


Interlux Brightside Largo Blue, thinned 5%, brushed, for the bow and stern.


Bleached the daggerboard with straight Clorox, let it dry overnight, it came out great, and part of the deck is clean now!

Our new favorite varnish, TotalBoat Halcyon Rugged Amber Gloss. One hour between coats, no sanding, soap and water clean up. What I really like is the Pour Pack, pour out what you need, squeeze out the air and it stores great. We like 2-3 coats, primarily for protection. We have not tried 6-8 coats like some folks do with other varnishes, so we don't know how well it builds.


First coat of TotalBoat WetEdge BluGlo White, brushed 100%.


03 Jun 19:
Coat of TotalBoat Topside Primer for the rubrails, which are preshaped pine trim from Lowes.

Sanded rudder with 120 grit on a DeWALT random orbital sander, rinsed with Clorox.

3rd and 4th coats of TotalBoat Halcyon varnish.

Installed rudder releasing mechanism, patented 1953 and used until 1969.


Installed the bridle eyestraps 10 inches forward of the transom, to the center of the strap. Fastened with #10 silicone bronze Frearson head wood screws, predrilled pilot hole.


2 coats of TotalBoat Halcyon varnish for rudder and tiller.

Gathering bits for CHIP, daggerboard, halyard and sheet.

05 Jun 19:
Used a Fuller #6 combination pilot bit and countersink, #6 x 3/4 inch stainless screws and Phillips head driver to install the rub rail.


28 Jun 19:
Had some clean up items over the last few weeks getting CHIP ready for Sea Trials. Painted the trim with TotalBoat WetEdge BluGlo White and Interlux Brightside Largo BLue.


Attached the coaming.


Yankee Driver.


Bridle.

Reassembled rudder.

Halyard cleat on the wooden boats is on the mast collar.


Used 1953 Alcort Sunfish ZIP's floorboard as a template.

Found out that the 2nd Gen wooden boat cockpits are actually a little shorter, so we had to measure and recut floorboards.


Used Grandpa Nelson's ratchting brace bit to auger the finger holes.

Cut floorboard cleats.


29 Jun 19:
Our 1963 Alcort Sunfish CHIP is ready for Sea Trials, so she needed to get off the finishing dolly and onto a Dynamic Dolly. I asked Skipper how to organize Sunfish TETRIS and she said she wanted her 1965 Alcort Sunfish WAVE to take a turn on he finishing dolly, get her purtied up like the other boats, fix the amateur patches I put on 20+ years ago. So first we dollied WAVE up to the Carriage House and dropped her in the grass. Next we used Skipper's field expedient Sunfish hoist to get CHIP off of the finishing dolly.

Lowered CHIP onto the Dynamic Dolly and rolled her out next to WAVE.

WAVE loaned CHIP her spars on deck Sunbrella cover, a fine cover that we got fro SLO Sail and Canvas. It has nice straps!

Rolled the finishing dolly out into the yard and walked each end of WAVE up onto the dolly. Rolled dolly into the Carriage House. WAVE telling fish stories to ZIP and WINNIE.

While we were in the Carriage House we shaved some yaks. "Yak shaving" is what we call it when we find other jobs to do while avoiding the primary job, which in this case was getting CHIP out back to the Sunfish Shack and finishing cleaning some air vents inside the house. Today's yaks to shave were cutting some 1/8th inch nylon line to make daggerboard retaining lines for WAVE and PHOENIX and whipping the ends of a couple of vintage Sunfish/Sailfish sheets.
We cut the nylon line to length and seared the ends. Line is long enough so that daggerboard can easily be removed, but not much longer than that. The retaining line is there to keep the daggerboard from floating away after a capsize.

Tied the line with a bowline. Make the little loop, the run the rabbit (end of the line) up through the hole...

...around the tree (long end of the line) and back down into the hole.

Snug down the bowline. Cut another line for PHOENIX. Yak 1 shaved.

Old School. Simple.


Yak Shaving Take 2. Wrapped the end of the sheet with a piece of gaff tape and seared the end. Then whipped the end with waxed line. Yak 2 shaved.
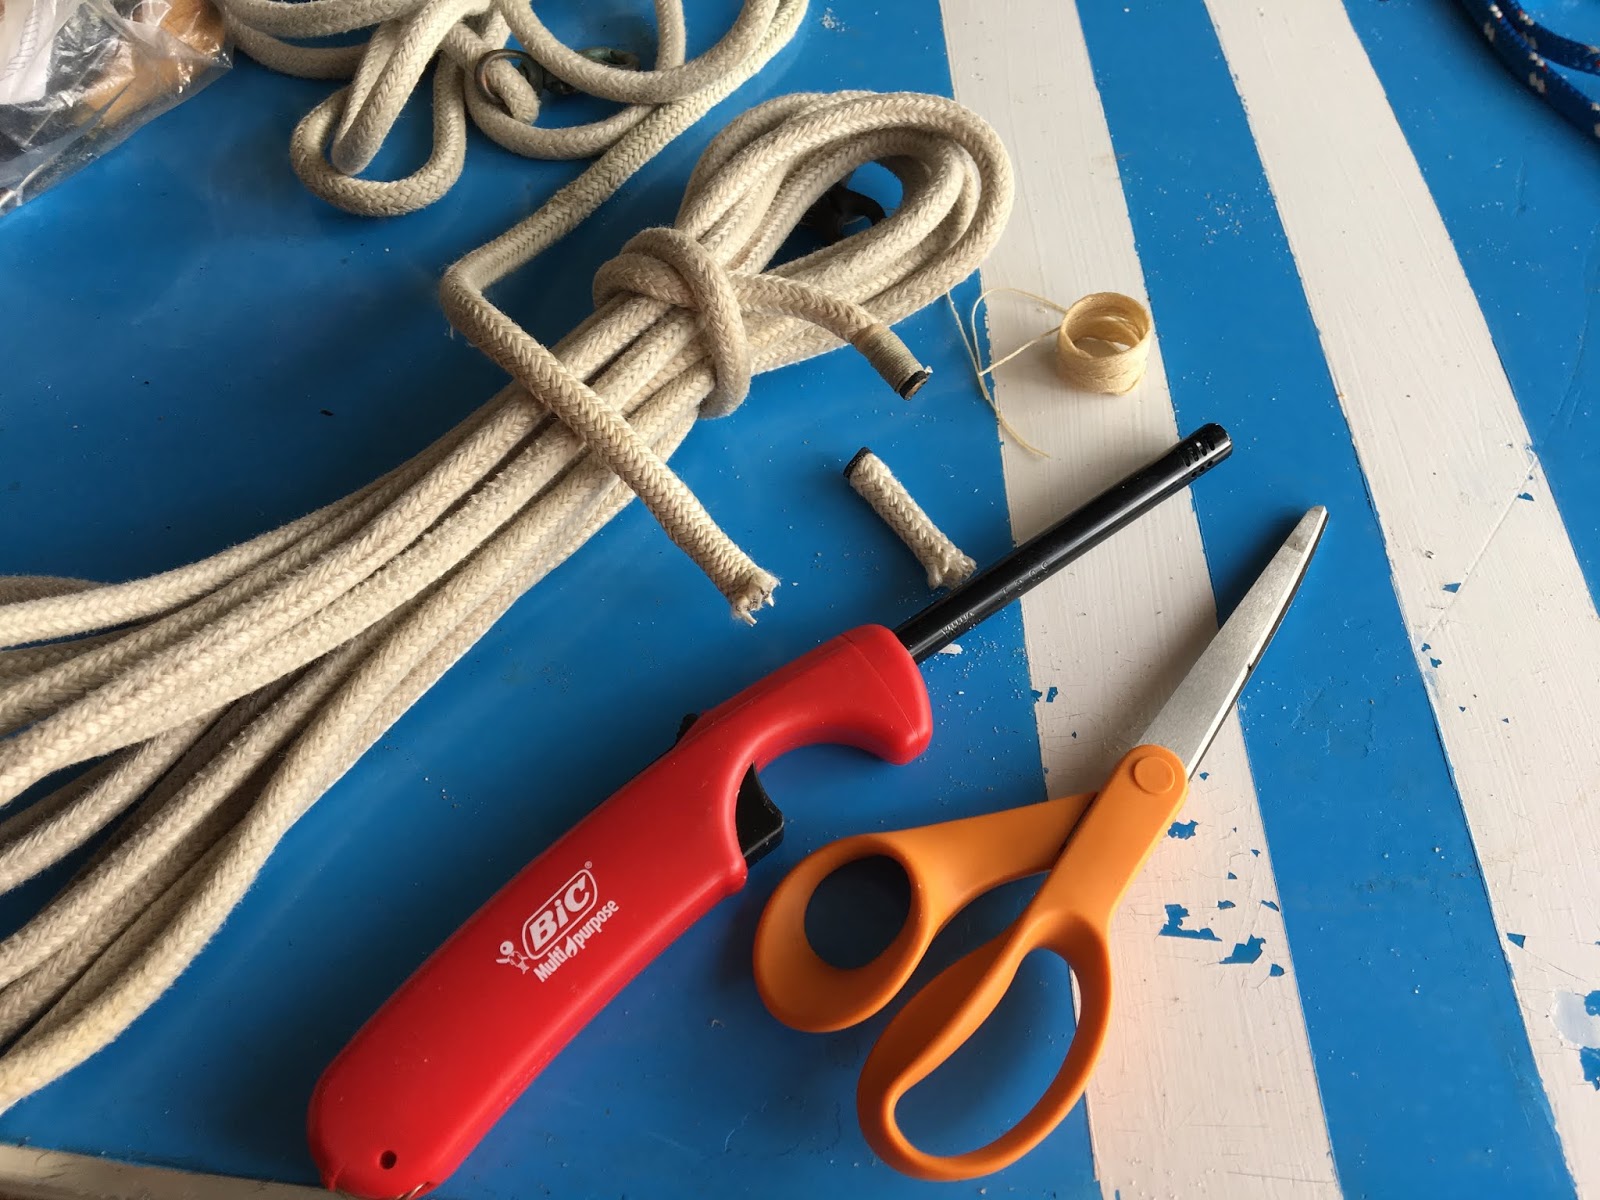
How to whip a line.

Back to our original unscheduled program, CHIP taking up WAVE's slip in the Sunfish Shack, ready for Sea Trials!
23 Jul 19:
We had our 1950s Alcort wooden Super Sailfish ZSA ZSA out for a photo shoot in the morning and then pulled out our 1963 Alcort wooden Sunfish CHIP to check the rigging. So while they were exchanging notes we took some pictures.
Here's the first time they meat, 2013 near Spartanburg, NC.


20 Jul 19:
CHIP is ready for Sea Trials!


We looked out and the wind was perfect for a beam reach on and off the beach. CHIP flew through Sea Trials, over, through and under a few waves. 98F Heat Index, the Bay felt like a hot tub. Winds steady at 14 gusting 17, one gust hit 25. But the waves were well spaced. She tacked all over the place, sail set great and blades behaved. The splashguard was excellent to divert the water taken aboard during submarine mode. The helm was responsive and the boat felt solid. We found that the tiller extension was too small of diameter for secure grip and too varnished, very slippery. ANnd if the sheet gets away, the boat just stops and the rudder can be used to maneuver back under the boom, grab the sheet and sail away. Bonus for the day, caught a stern wave!


10-11 Sep 19:
Picked up SMEDLEY, Eddie and his team made the trailer 15' 6" so it will fit in a Pods moving and storage container. They cut off about a foot on the tongue, and the trailer looks better and still tows great. We had asked for a longer tongue when we had the trailer built, thinking we could back the boat all the way into the water, but it turned out it was easy to get the boat on and off the trailer with the rollers.

The Pod arrived and SMEDLEY fits! With room to spare on the side.


Once SMEDLEY was in we built a rack over the top. It holds the Super Sailfish ZSA ZSA and Sunfish MADISON. Suspended above is our wooden Sunfish ZIP, and below are the Standard Sailfish WINNIE and wooden Sunfish CHIP. The rack also held all of the spars and sails, there was also room for 4 Dynamic Dollies which break down easily. We also put the compact planer in the Pod and all of our boat patterns.

12 Sep 19:
The Pod Full of Fish departed to Virginia, full of our Standard Sailfish WINNIE, Super Sailfish ZSA ZSA, wooden Sunfish ZIP and CHIP, Catfish SMEDLEY and fiberglass Sunfish MADISON.

12 Sep 19:
The Pod Full of Fish departed to Virginia, full of our Standard Sailfish WINNIE, Super Sailfish ZSA ZSA, wooden Sunfish ZIP and CHIP, Catfish SMEDLEY and fiberglass Sunfish MADISON.
Next stop Chesapeake!
15 Oct 19:
CHIP found her way into the latest issue of WoodenBoat, she is in the Relaunchings section of the magazine. Proud owners!


06 Jun 20:
We thought we had our Sunfish stored nice and dry, under a tin roof and with a SLO Sail and Canvas Spars-On-Deck cover. When I moved CHIP to get to the old floorboards underneath, I heard water slosh. Uh oh. We pulled the cover off and found that water rain water had blown into a gap in the cover at the stern and drained down into the cockpit, caused by the mast holding the cover up just a bit. The gap was our fault, I should have snugged the cover down a bit more. The cockpit was fine, we sponged out the water, but the floorboards warped and had mold. We cleaned everything up and will try to save the floorboards, right now we parked the dolly on top of them to flatten them back out. Stay tuned...

23 Jul 20:
Floorboard are flattened out and cleaned up. We ordered some TotalTread from Jamestown Distributors to put on the floorboards, a little traction down there would be nice. She's in the queue for a floorboard refinish.
29 Jan 21:
One of CHIP's floorboards went missing in Hurricane Sally surge, the other floated 300 feet up to the Carriage House, so we cut a new floorboard out of 1/4 inch marine grade plywood.


01 Feb 21:
We're trying out TotalTread Non Skid on the floorboards for our 1963 wooden Sunfish CHIP and in the bilge of SCUPPERS. It went on smooth and as the coating dried the spheres emerged.


24 Feb 21:
CHIP got banged up a little during Hurricane Sally, some chips along the deck edge and one floorboard washed away. We filled in the divots with TotalBoat THIXO thickened epoxy dispensed from a 18:1 High Thrust caulk gun and smoothed it out as best we could with a plastic spreader, hoping to minimize sanding.


16 Mar 21:
Our Sunfish CHIP is scheming an air freight trip to the Pacific Northwest, we had a shipping box made from double wall cardboard. Picked the box up and we'll pack CHIP for the trip soon.

03 April 21:
Still moving bits around as the Armada shifts Homeport from the Gulf Squadron to the Atlantic Squadron. Carriage House was getting a little crowded with 2 Sunfish on dollies and a lawn tractor, and we wanted one of the Sunfish easily accessible for nice sailing days ahead before the final move.


18 Apr 21:
CHIP spent a little time at sea during Hurricane Sally and worked up against a piling for an hour or so. We repaired one small chip and thought it prudent to do an air leak test to make sure she is still water tight. We found a few small areas that could use attention, not uncommon for a 58 year old wooden boat. For the air leak test we blew low volume, low pressure air into the hull with a shop vac and sprayed they hull with a mix of Dawn dishwashing liquid in water. The important point when pumping air into a pontoon hull is to go slow and don't pump in too much air, it is possible to over-pressurize the hull and pop a seam, or cause an internal block to pull loose in the fiberglass hulls.


19 Apr 21:
In order to seal up a few tiny leaks on CHIP's hull, we are going to spread on a very thin coat of TotalBoat THIXO thickened epoxy, but first we need to remove hardware and sand the deck lightly.


25 Apr 21:
Scuffed CHIP's deck with 120 grit on a DeWALT Random Orbital Sander in prep for primer coat of TotalBoat Topside Primer and finish coats of TotalBoat WetEdge Blue Glo White.


26 Apr 21:
Brushed on a finish coat of Interlux Brightside Largo Blue, thinned 5 percent.


29 Apr 21:
Applied 2 coats of Interlux Brightside Largo Blue, thinned 5 percent with 333 Brushing Liquid, with a brush. First coat.


20 Jun 20:
We wrapped up the last few items on our 1963 Alcort wooden Sunfish CHIP, a few weeks back reattached the keel strip and bow handle after touchup paint.


Jun 2021:
Our 1963 Alcort Sunfish CHIP is loaded in a PODS container, ready for his trip to Pt Townsend to his new home. We tied a lot of lines that Emiliano and crew will have a fun time untying.


12 Jan 22:
1963 Alcort wooden Sunfish CHIP seems to be enjoying his new home in Pt Townsend, WA and is being pampered by his new owners, seems CHIP got another sail to go with his first sail.

Boa tarde..!
ReplyDeleteAmo barcos!
Gostaria muito , mas muito mesmo de construir um igual a esse.
Vocês vendem o projeto ?
Quanto custa ?
Se for possível eu gostaria de construir um.
Pode ser até menor.
Seria o meu primeiro barco.
Paixão desde criança..!
Grato e parabéns pelo trabalho artístico dos Senhores...
Belo trabalho..!
ReplyDeleteObrigado. Estamos trabalhando em planos.
ReplyDeleteEstou louco para tentar contruir um.
ReplyDeleteQual é a altura das laterais?
Acho lindo o desenho deles...
Não há como me passar só algumas medidas ?
ReplyDeleteDesculpem , estou fascinado...
modo de espera. Keep an eye on this blog page https://smallboatrestoration.blogspot.com/p/alcort-wooden-sunfish.html
ReplyDeleteThat is where we will post some measurements, starting with the transom and side planks.
Então , vão me ajudar?
ReplyDeletePoderiam me ajudar para fazer um com onze pés +- ?
ReplyDeleteObrigado...
Hello, please contact me at Lewis.kent@gmail
DeleteI also Have a wood 63 Sunfish that I'm restoring, I know it's a long shot, but only thing I'm missing is the bronze bracket made by Wilcox and Crittenden for the splash board. Do you know somebody that has one?
ReplyDeleteHowdy. Those are hard to find! You might ask on The Sunfish Forum Wanted Ads and keep an eye on ebay. FWIW the earlier wooden Sunfish like our 1953 boat ZIP have a wooden bracket. Cheers, Clark and Skipper
ReplyDelete