18 Jan 21:
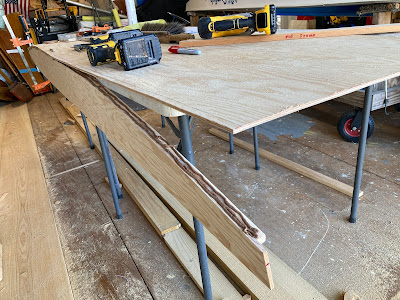
Before we attached the planks we sanded the seams to smooth out the THIXO. 60 grit did the job. Also tried out the new adapter for the shop vac hose, it works great, no more blue tape for me!
Used a 3/4 inch roundover bit on the router to ease the edge of the chine strip, hand sanding would also do the trick. This will also help keep water from sitting on the chine.
We might have little granddaughter fingers down there, we want all edges and seams in the boat to be eased and smooth. No place for hard edges in a small boat.
We are experimenting with different adhesives on this boat, used THIXO on one of the plank/bottom seams. Spolier Alert: THIXO was a lot more fun and agreeable to work with than the other methods we tried.
Back up a minute, it is good to scribe a nail/screw line along the bottom panel before dispensing adhesive.
We used #6 x 3/4 inch silicone bronze screws to attach the panel, pilot drilled and counter sunk. We plan for the screws to be puttied over and stay in place. Attached plank in the middle first and worked our way out to either end.
Used our Alcort nailing jig to get mostly uniform spacing for the screws, the same pattern used on wooden Sunfish and Sailfish, about 1 7/8 inch spacing. I forgot that it is also designed to mark the nailing line.
The slotted screw was a pain to work with, Frearson head would have made it easier, but all I had today were slotted. I shot a rambling video about how to look for the epoxy to squeeze out a little, that is all the pressure that is needed, as fastening any tighter may force all of the epoxy out of the joint. May or may not post the video...
In the other seam we wanted to try two different sealant methods, one is Old School, fabric saturated with oil based paint. Here is some Rustoleum soaked into terry cloth shop towel strips. The bottom plank is then nailed or screwed on, 1880s iron square nails if you have 'em. This method was very messy, lots of paint runs.
The other sealant we tried was Loctite PL Subfloor adhesive, bron blobs on the right. It tacked quick and started to harden, very hard to work with as I got to the last few screws. A lot of folks use PL Premium on their weekend boat but be advised you need to work fast.
Both garboards attached. The little 1 inch tuck athwartships that I put in both ends made it hard to pull in the sides, while simultaneously bending the bottom panel down, drilling pilot holes and driving slotted screws. Needed 5 hands, had 2 hands and a hip.
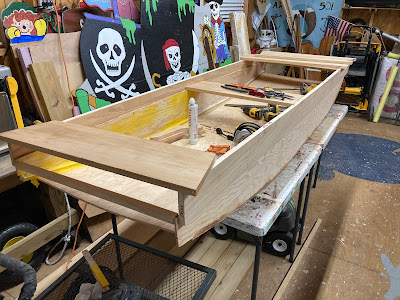
I burnt up 2-3 hours today trying to design in a little side flare, but there is not enough garboard there to flare, and I didn't put a bevel in the chine, as that would be a lot of work beyond most skills of first time builders and a lot of extra time for an 8 foot punt. Plus there would need to be beveled frames about every foot to keep the 1/4 inch plywood from getting humps and hard spots, and a more elaborate shape when cutting the plank. In the photo below I've cut my design time losses and moved on to making the sides plumb and attached the 3/4 inch thicker upper plank (sheer plank), which helped straighten out the 1/4 inch thick garboard.
Sheer plank dry fit.
Fiddling with seats and frames. There will be a seat riser underneath the seat, along the inner edge of the frame.
Pondering bow and stern rakes.
Log of BLUFF RATTY.


No comments:
Post a Comment